Friday, August 12, 2011

The Best Salsa Ever

With garden season in full swing, it must be time to make salsa!  I've tried a few versions, and I go back to this one every time.  The spices really give the salsa a nice flavor, and you can easily adjust the amounts of ingredients to your liking (spicy - add both jalapenos, not so spicy - hold back a little).  Its the perfect blend for a salsa - not to chunky, not too watery.  Its a great salsa to eat with chips, but I have also used it for other Mexican cooking, to top our eggs with, and I have even had success canning this recipe.

Annie's original recipe called for 2 large vine tomatoes and 1 can (28 oz) of diced tomatoes.  Since we have more tomatoes in our garden than we know what to do with, I just used a bunch of tomatoes, maybe 8-12 or so, depending on size.  If the batch seems like it might be too spicy, I add in another tomato or two.  I usually quarter the tomatoes and add about 6-8 full tomatoes to the food processor, then I remove the "guts" of the others so the salsa isn't too watery.  If your food processor is getting a little full, you can always process the tomatoes separately then stir everything together at the end.

The Best Salsa
adapted slightly from Annie's Eats

2 fresh jalapeno peppers, seeded and very coarsely chopped
4 cloves garlic, halved
8-12 large vine-ripened tomatoes, OR 2 tomatoes and 1-28oz can diced tomatoes
2 tbsp. red wine vinegar
1 tbsp. cumin
1/2 sweet yellow onion, coarsely chopped (I have also used red onion, or half red and half yellow)
1/4 tsp. salt
1/2 tsp. ground cayenne pepper
1/4 cup fresh cilantro (more if you really like cilantro)
juice of one lime

DIRECTIONS:
1.  In the bowl of a food processor, combine the jalapenos and garlic. Process until finely chopped. Scrape down the sides of the bowl.
2.  Add all other ingredients to the food processor. Pulse in very brief pulses until the vegetables have reached the size you desire (it does not take many pulses so don’t overdo it).
3.  Transfer to an airtight container and refrigerate at least 2 hours before serving to allow the flavors to blend.

Thursday, August 11, 2011

Olga's Pita Bread - BLTs and Snackers

Have you ever eaten at an Olga's Kitchen?  It might be a Michigan chain, I'm not sure.  But they have the BEST pita bread EVER!  When we were younger, my mom would take us there for a quick dinner in between dance classes.  I would get either the three cheese Olga with tomatoes and onion, or the BLT Olga.  I really just wanted anything that came with the Olga bread.
 I came across a reference to Olga bread in the meal-plan of one of the blogs I follow.  I knew I had to look up a recipe!  With bacon and lettuce on hand and fresh tomatoes from the garden, dinner was planned.


The recipe below makes 16 pitas, but I cut it in half for the two of us (made 8 medium sized pitas).  I used about half of the pita bread to make Olga's snackers - Just cut the pita into trianges, spray with some olive oil, sprinkle with spices of your choosing and bake at 375F for about 5 minutes (maybe less) - that aren't supposed to be crisp, just baked a little more.

I thought this bread was really good and tasted a lot like the Olga bread I remember.  And its really pretty easy to make.  I'm already planning to make this again soon!  But first, I need to find a recipe for their cheesy snacker dip...

Imitation Olga Bread
source: buddhabelly on Food.com

1 cup milk
1/4 cup honey
1/4 cup margarine
1 teaspoon salt
2 1/4 teaspoons active dry yeast (1 pkg.)
1/4 cup warm water
1 teaspoon sugar
4 cups flour, divided
1 egg

DIRECTIONS:
1. Scald milk, remove to large bowl.  Add honey, margarine and salt to milk, stir until margarine is melted.  Set aside to cool until lukewarm.
2. Combine yeast, warm water and sugar, stir until sugar is dissolved.  Set aside.
3. Add 1 1/2 cups of the flour to lukewarm milk mixture and beat well.  (I used the dough hook on my Kitchenaid for this.)  Mix in egg and yeast mixture.  Add remaining flour, a little at a time, until sticky dough is formed.
4.  Turn out on a floured surface, knead about two minutes.  Dough will be sticky, but don’t add more flour. (I had to add just a little more flour, it was really sticky! They still turned out fine!)
5.  Place dough in oiled bowl, turning once to oil whole surface of dough.  Cover with plastic wrap and let stand in warm place until doubled in bulk. (I left mine for about 90 minutes.) 
6.  Punch down dough; divide into 16 equal pieces.  Roll each piece to a thin rough circle about 8-1o inches in diameter (mine were a little smaller; don't worry too much about a perfect circle, she shape is distorted a little when you transfer to the pan). 
7. Heat a large dry skillet over medium-high heat; do not use any oil.  Bake 15-20 seconds, flip and bake about 15 seconds on other side, until mottled brown spots appear.  Cool and store in a plastic bag. 

BLTs
For the BLTS, I just spread a little mayo on the Olga, and topped with 3 pieces of bacon, some tomato slices, and lettuce.  Very easy!

Snackers
For the snackers, I cut 3-4 pitas into triangles and placed them in a bowl.  Spray with olive oil cooking spray, and sprinkle on spices (chili powder, paprika, garlic salt, sesame seeds; but whatever you enjoy would work fine).  I didn't measure anything, but just add enough to suit your tastes.  Then place them in a single layer on a cookie sheet and bake in a 375F oven for a few minutes.  Yummy snack or side!

Sunday, July 24, 2011

Cilantro Lime Rice

I wanted something to serve along side these Chicken Fajitas, and this recipe was quick, easy, and used up more of our cilantro stash from the garden.  I know the rice looks green, but it was VERY yummy!  The cilantro really shined through, but wasn't overpowering.  We will definitely be making this rice instead of traditional Mexican rice more often.
Cilantro Lime Rice
recipe from Annie's Eats, originally from Everyday Food

1 cup long grain rice
2 cups plus 2 tablespoons water, divided
½ tsp. salt
½ cup fresh cilantro
2 tbsp. freshly squeezed lime juice
1 tbsp. olive oil
1 clove garlic, chopped

DIRECTIONS:
1. Combine the rice, 2 cups water and salt in a medium saucepan set over medium-high heat.  Bring to a boil, stir briefly, cover and reduce the heat to low.  Let cook, covered, until the water is absorbed and rice is fluffy and tender, 16-18 minutes. (Cooking time and directions can vary depending on the brand of rice.  Check the package directions.)
2. While the rice is cooking, combine the cilantro, lime juice, olive oil, garlic and 2 tablespoons water in a blender or food processor.  Blend until smooth.  Stir the mixture into the cooked rice and fluff with a fork.

Chicken Fajitas

We have had some really good food lately, and there are some recipes I definitely don't want to forget!  This is one of those recipes, which we made with Cilantro Lime Rice.  We had an abundance of cilantro in the garden to use, and fajitas immediately came to mind.  I found this recipe when searching for a good cilantro-lime marinade.  It was very tasty, we especially liked the touch of the grilled tortillas.  The only thing missing from this dinner was margaritas!

Grilled Chicken Fajitas
from Annie's Eats, originally from Cook's Illustrated

1/3 cup freshly squeezed lime juice
6 tbsp. vegetable oil, divided
3 cloves garlic, minced or pressed
1 tbsp. Worcestershire sauce
1½ tsp. brown sugar
1 jalapeño, seeded, ribbed and diced
1½ tbsp. minced fresh cilantro
1 tsp. salt
¾ tsp. pepper
2-3 boneless, skinless chicken breasts, about 1½ lbs., pounded to an even thickness
1 large red onion, sliced into ½-inch thick slices
2 large bell peppers, sliced
8-12 (6-inch) flour tortillas


DIRECTIONS:
1. In a medium bowl, whisk together the lime juice, 4 tablespoons of the vegetable oil, garlic, Worcestershire sauce, brown sugar, jalapeño, cilantro, salt and pepper.  Reserve ¼ cup of the marinade; set aside.  Place the chicken breast halves in the marinade, cover with plastic wrap and refrigerate for 30 minutes.
2.  Heat grill, and grill the chicken until it is well browned, 3-4 minutes.  Using tongs, flip the chicken and continue grilling until it is no longer pink inside (or an instant-read thermometer inserted into the center reads 160˚ F.)
3. Meanwhile, heat the remaining 2 tablespoons vegetable oil in a skillet and saute onions and peppers over medium heat until soft.  Season with salt and pepper and toss with 2 Tbsp. of the reserved marinade just as they are done.
4. When the chicken and vegetables are done, transfer them to a large plate and tent with foil to keep warm.
In 2 or 3 batches, transfer the tortillas in a single layer to the now empty grill over low heat.  Cook until warm and lightly browned, about 20 seconds per side.  When the tortillas are done, wrap them in a clean kitchen towel or foil.
5. Slice the chicken into ¼-inch strips and toss with the remaining 2 tablespoons of reserved marinade in another bowl.  Arrange the chicken and vegetables on a large platter with the warmed tortillas and serve with sour cream, lime wedges, or other toppings of your choosing.

Wednesday, March 16, 2011

Guinness Cupcakes aka Irish Car Bomb Cupcakes

Happy St. Patty's Day everyone!

Maybe I'll get around to posting every now and then, who knows. In the mean time, I thought I would jump in around where I left off and share these amazing cupcakes I made last year to celebrate March 17th and everything Irish and green. Whats better than a sweet treat with the alcohol included (most of it bakes off, yes, but that frosting is potent and delicious!)? Enjoy!


Irish Car Bomb Cupcakes
*Note: This name is not meant to offend anyone, it is in reference to a drink. If you find it offensive, please call them Guinness Cupcakes.
Recipe from: Smitten Kitchen

Makes 20 to 24 cupcakes

For the Guinness Chocolate Cupcakes

1 cup stout (such as Guinness) *Hubby loves that this leaves at least a half can of Guinness for him!
1 cup (2 sticks) unsalted butter
3/4 cup unsweetened cocoa powder
2 cups all purpose flour
2 cups sugar
1 1/2 teaspoons baking soda
3/4 teaspoon salt
2 large eggs
2/3 cup sour cream

Ganache Filling
8 ounces bittersweet chocolate
2/3 cup heavy cream
2 tablespoons butter, room temperature
1 to 2 teaspoons Irish whiskey (optional, I used more like a Tablespoon.. or a little more)

Baileys Frosting
3 to 4 cups confections sugar
1 stick (1/2 cup or 4 ounces) unsalted butter, at room temperature
3 to 4 tablespoons Baileys (or milk, or heavy cream, or a combination thereof)
*I made a double batch of the frosting, and used 3 of the mini-bottles of Baileys.. I didn't measure, but I know I added more than is listed here

Make the cupcakes:
1. Preheat oven to 350°F. Line 24 cupcake cups with liners. Bring 1 cup stout and 1 cup butter to simmer in heavy large saucepan over medium heat. Add cocoa powder and whisk until mixture is smooth. Cool slightly.

2. Whisk flour, sugar, baking soda, and 3/4 teaspoon salt in large bowl to blend. Using electric mixer, beat eggs and sour cream in another large bowl to blend. Add stout-chocolate mixture to egg mixture and beat just to combine. Add flour mixture and beat briefly on slow speed. Using rubber spatula, fold batter until completely combined.

3. Divide batter among cupcake liners, filling them 2/3 to 3/4 of the way. Bake cake until tester inserted into center comes out clean, rotating them once front to back if your oven bakes unevenly, about 17 minutes. Cool cupcakes on a rack completely. (Yes, I made mini-cupcakes because I thought the bite size-ness would work better for the party we were going to. No, I do not remember how long I bakes them, but it was less than 17 minutes.)

Make the filling:
4. Chop the chocolate and transfer it to a heatproof bowl. Heat the cream until simmering and pour it over the chocolate. Let it sit for one minute and then stir until smooth. (If this has not sufficiently melted the chocolate, you can return it to a double-boiler to gently melt what remains. 20 seconds in the microwave, watching carefully, will also work.) Add the butter and whiskey (if you’re using it) and stir until combined. If you add the whiskey to a very hot mixture, some of the alcohol will evaporate. Wait until it cools a little if you want a more potent filling.

Fill the cupcakes:
5. Let the ganache cool until thick but still soft enough to be piped (the fridge will speed this along but you must stir it every 10 minutes). Meanwhile, using a small knife or an apple corer, cut the centers out of the cooled cupcakes. You want to go most of the way down the cupcake but not cut through the bottom — aim for 2/3 of the way. A slim spoon or grapefruit knife will help you get the center out. Those are your “tasters”. Put the ganache into a piping bag with a wide tip and fill the holes in each cupcake to the top. I did not put the removed cake back on top of the filling, I just frosted right over it.

Make the frosting:
6. Whip the butter in the bowl of an electric mixer, or with a hand mixer, for several minutes. You want to get it very light and fluffy. Slowly add the powdered sugar, a few tablespoons at a time.

7. When the frosting looks thick enough to spread, drizzle in the Baileys (or milk) and whip it until combined. If this has made the frosting too thin, beat in another spoonful or two of powdered sugar to reach a piping consistency. (You may need to add a bit more powdered sugar if you use as much Baileys as I did!)

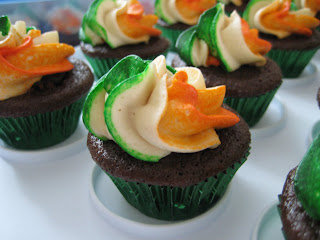
8. Ice and decorate the cupcakes. [I used a similar method as here, I painted stripes of orange and green gel food coloring up the insides of the piping bag, and then slowing swirled the cupcakes as I was frosting them.]

REVIEW: Awesome. These are so good! You can easily adjust the amount of whiskey and Baileys to suit the tastes of your crowd. I thought the cupcakes were really moist and I was extremely pleased with how they turned out. Plus, they were quite the topic of conversation!

Wednesday, March 31, 2010

2 months

That's right. TWO MONTHS since my last post. Well, that is unacceptable. And I missed my 1-year-blogiversary, but I'm not even sure I can count it given that I took the entire last month of that first year off. (Did you follow that?)

I have actually been in the kitchen. I've baked some new goodies, tried a few new fish recipes in honor of Lent, took my first stab at eggplant.... and made a lot of our old favorites and other quick dishes that aren't really worth a picture or blog post.

So, I have some catching up to do. But today is my birthday. So maybe tomorrow. There is nothing wrong with showing you St. Patrick's Day cupckaes at Easter, right?

Sunday, January 31, 2010

Beef and Pinto Bean Chili

I recently subscribed to Cooking Light magazine, and I just got my first issue this month. The cover featured a delicious-looking bowl of hearty chili, and the timing coincided perfectly with the near-zero temps we have had here lately.

We usually make Josh's White Chicken Chili, but I thought the beef would be a nice change since I don't often buy red meat. The recipe called for beef chunks, which is a little different from other recipes that call for ground beef. There was a lot of depth to the flavor of this chili, without it being too spicy. Overall it was quite yummy!

Beef and Pinto Bean Chili
from Cooking Light
makes 6 servings

cooking spray
1 pound boneless chuck roast, trimmed and cut into 1-inch pieces
3/4 teaspoon salt, divided
2 tablespoons canola oil (I used olive oil)
4 cups chopped onion (about 2 medium)
1/4 cup minced jalapeño peppers (about 2 large, use ribs for more heat)
10 garlic cloves, minced (yes, we used that many!)
1 (12-ounce) bottle beer (I omitted)
1 tablespoon paprika
1 tablespoon ground cumin
2 tablespoons tomato paste
3 cups fat-free, less-sodium beef broth (I used ~2 cups and 1 cup water)
1 (28-ounce) can whole peeled tomatoes, drained and chopped
1 (15-ounce) can pinto beans, rinsed and drained
1/2 cup thinly sliced radish (for garnish, I omitted)
1 avocado, peeled, seeded, and chopped (for garnish)
6 tablespoons small cilantro leaves (for garnish, I omitted)
6 tablespoons sour cream
6 lime wedges (I omitted)

DIRECTIONS:
Heat a stock pot (or Dutch oven) over high heat. Coat pan with cooking spray. Sprinkle beef evenly with 1/4 teaspoon salt. Add beef to pan; sauté 5 minutes, turning to brown on all sides. Remove from pan.

Add oil to pan; swirl to coat. Add onion and jalapeño; sauté 8 minutes or until lightly browned, stirring occasionally. Add garlic; sauté 1 minute, stirring constantly. Stir in beer, scraping pan to loosen browned bits; bring to a boil. Cook until liquid almost evaporates (about 10 minutes), stirring occasionally. Stir in paprika, cumin, and tomato paste; cook 1 minute, stirring frequently. Add broth, tomatoes, beans, and beef; bring to a boil. Reduce heat, and simmer (uncovered) 1 1/2 hours or until mixture is thick and beef is very tender, stirring occasionally. Stir in remaining 1/2 teaspoon salt.

Ladle 1 cup chili into each of 6 bowls. Divide radish and avocado evenly among bowls. Top each serving with 1 tablespoon cilantro and 1 tablespoon sour cream. Serve with lime wedges.