Slowly but surely....
I still have like a dozen things to post, but I got a few up over the last 2 days. Soon to come are some garden updates - that thing is out. of. control. - some recipes for our garden herbs, more grilling recipes, a few desserts, and even a few recipes Josh tried to make.
Stay tuned! And I'm sorry for slacking!
Tuesday, June 30, 2009
4th of July Cupcake Bites
 We are headed to a fireworks viewing party tomorrow, and I wanted to make a festive treat. Since its supposed to be fairly cool outside, I decided that cake bites would hold up ok, and they would be fun for the kids. I described how to make them here, and referenced the Bakerella post with all the details.

Potato Salad
I happened to see this recipe on Pioneer Woman the other day and thought it would be nice to have around with the 4th of July holiday coming up. Josh has been asking for potato salad, so the timing worked out great. (Sorry about the bad picture, it was rainy and dark here yesterday.)
 PW's Potato Salad
serves a crowd
 PW's Potato Salad
serves a crowd
5 pounds russet potatoes (about 8 medium russets)
1 1/2 cups real mayonnaise (NOT Miracle Whip)
4 tablespoons prepared mustard (regular, Dijon, or a mixture of both)
5 green onions, sliced up to the darkest green part
8 small sweet pickles (may use dill if that’s more up your alley)
1 teaspoon kosher salt (more to taste)
1/2 teaspoon paprika
1/2 teaspoon black pepper
4 hard boiled eggs, coarsely chopped
(I also added 1/2 cup chopped celery to mine, and a few sprigs of dill from the garden)
DIRECTIONS:
1. Cut potatoes in bite-size chunks, then boil until fork tender. Drain and cool slightly.
2. Mash potatoes or run them through a ricer or food mill to make them extra fluffy.
3. Fold potatoes together with mayonnaise, mustard, green onions, salt, pepper, and other seasonings you like. Fold in pickles and eggs, then taste for seasonings, adding more salt, mustard, or mayo as needed. You may also splash in juice from the pickle jar if salad needs a little moisture.
REVIEW:
This was good, but a tad too mustard-y for my taste. The pickles are essential though, and add a great crunch to the salad. This would be a great BBQ side.
Apple Pie Cupcakes
 I made these for father's day, but they would be a great addition to a 4th of July party! This is an easy way to serve the ever-American "apple pie."
Apple Pie Cupcakes
adapted liberally from Annie's Eats
Yield: 24 cupcakes
For the cupcakes:
3 cups sifted cake flour
1 Tbsp. baking powder
½ tsp. salt
1 tsp. cinnamon
1/4 tsp. nutmeg
1 c. butter, softened
2 c. sugar
4 eggs
2 tsp. vanilla extract
1 c. milk
For the apple filling:
2 tbsp. butter
2 tsp. cinnamon
2-3 tbsp. sugar
3 large Granny Smith apples, peeled, cored and diced
For decorating - Vanilla Buttercream: (I made half of this recipe)
2 1/2 sticks unsalted butter, softened
2 1/2 c. confectioners' sugar, sifted
1/8 tsp. salt
2 tsp. vanilla
2 tsp. heavy cream (I used milk)
DIRECTIONS:
1. To make the cupcakes, preheat the oven to 350°. Line two cupcake pans with paper liners.
2. In a medium bowl, sift together the cake flour, baking powder, salt, cinnamon and nutmeg. In the bowl of an electric mixer, cream the butter and sugar together on medium-high speed until light and fluffy, about 4 minutes. Beat in the eggs one at a time, mixing well and scraping down the sides of the bowl after each addition. Add the vanilla extract and mix well to combine. Add in the dry ingredients alternately with the milk, beginning and ending with the dry ingredients. Stir until just combined.
3. Divide the batter evenly among the cupcake liners, filling them about 2/3-3/4 full. Bake until golden and a toothpick inserted in the center comes out clean, about 18 to 22 minutes. Remove from the oven and allow to cool for 5 minutes in the pans. Transfer to wire racks to cool completely.
4. To make the apple filling, heat the butter a medium skillet over medium-high heat. Add the cinnamon and sugar and cook for a minute, until the mixture begins to bubble. Lower the heat to medium and stir in the apples. Mix well. Cook until the apples are somewhat tender, about 10 minutes. Remove from heat and let cool.
5. While the apple mixture is cooling, use the cone method to remove a chunk from the center of each cupcake, making sure to leave a rim around the top of the cupcake. (Annie describes the cone method in her post.) Fill the holes with the cooled apple mixture. To decorate, top each cupcake with a swirl of vanilla buttercream.
REVIEW:
These were very yummy! They were much easier to serve than a traditional pie, and the flavors were great.
Spice-Rubbed Pork Tenderloin
I had some pork tenderloin in the freezer, and I came across this on Taste & See. This is a very simple way to prepare the tenderloin, and it is very flavorful!

Spice-Rubbed Pork Tenderloin
from Cooking Light Magazine, March 09; serves 4 (3 oz each)
1 tsp sugar
1 tsp garlic powder
3/4 tsp salt
1/2 tsp ground allspice
1/2 tsp ground cumin
1/4 tsp dried thyme
1/4 tsp ground nutmeg
1/4 tsp ground cinnamon
1/8 tsp ground red pepper (I used cayenne)
1 (1-pound) pork tenderloin, trimmed
2 tsp olive oil
DIRECTIONS:
1. Preheat oven to 350.
2. Combine first 9 ingredients; rub over pork. Let stand 30 minutes. Heat oil in a medium ovenproof skilled over medium-high heat. Add pork to pan; cook 4 minutes, browning on all sides.
3. Bake at 350 for about 20 minutes or until a thermometer registers 160, turning after 10 minutes. (our took closer to 45 minutes....) Let stand 10 minutes. Cut pork crosswise into 1/2-inch thick slices.

Nutritional Info: 166 calories; 6.3g fat; 24g protein; 2.1g carbs; 0.5g fiber; 74mg cholesterol; 1.7mg Iron; 500mg sodium; 13mg calcium.
REVIEW:
Very moist and flavorful. When served with a veggie, this makes for a great low-cal, low-fat dinner that is high in protein.
Grilled Chicken Parmesan
So, you haven't seen to many dinner recipes around here lately. That's because there aren't many to post. During the summer, Josh and I eat mostly grilled chicken and veggies. A lot of times we simply use Chicken seasoning, or a Lawry's marinade, and Josh grills the chicken with asparagus, peppers, zucchini, or corn; and a potato for him. We eat this ~3 times a week probably. So there isn't that much to post about! However, Josh wanted something different a few weeks ago, and found this recipe. I made a few minor tweaks, and he was at the grill. Good job honey! Grilled Chicken Parmesan
2. Heat grill to medium high. Place chicken on foil-lined grill. Cook chicken for about 7 minutes on each side or until desired doneness.
3. While chicken is cooking, heat up marinara sauce. Ladle sauce over each piece of chicken, sprinkle on Parmesan cheese and mozzarella. Cover with foil, turn grill down to medium low and cook until cheese has melted; 1-2 minutes. REVIEW:
It was nice to enjoy chicken parm without turning on the oven or stove top. Clean up was easy since we lined the grill with foil. I'm watching my calories, so I didn't miss the standard breading on the chicken at all! If you go light on the cheese, this is very diet-friendly meal. I didn't bother to make a starch, but this would be great over a bed of noodles or with a side of mashed potatoes.
 Grilled Chicken Parmesan
adapted from Better Recipes, serves 4 but we cut in half for the 2 of us
4 boneless, skinless chicken breasts
2 Tbsp olive oil
1 tsp dried thyme
1 tsp dried basil (I used 1 T fresh)
1 tsp dried parsley
1/2 tsp steak seasoning
2 cups packaged marinara sauce
1/2 cup grated Parmesan cheese, divided
1 cup shredded mozzarella cheese, divided
2 Tbsp olive oil
1 tsp dried thyme
1 tsp dried basil (I used 1 T fresh)
1 tsp dried parsley
1/2 tsp steak seasoning
2 cups packaged marinara sauce
1/2 cup grated Parmesan cheese, divided
1 cup shredded mozzarella cheese, divided
DIRECTIONS:
1. In a small bowl combine oil, thyme, basil, parsley and steak seasoning. Brush on both sides of chicken breasts.2. Heat grill to medium high. Place chicken on foil-lined grill. Cook chicken for about 7 minutes on each side or until desired doneness.
3. While chicken is cooking, heat up marinara sauce. Ladle sauce over each piece of chicken, sprinkle on Parmesan cheese and mozzarella. Cover with foil, turn grill down to medium low and cook until cheese has melted; 1-2 minutes.
 REVIEW:
It was nice to enjoy chicken parm without turning on the oven or stove top. Clean up was easy since we lined the grill with foil. I'm watching my calories, so I didn't miss the standard breading on the chicken at all! If you go light on the cheese, this is very diet-friendly meal. I didn't bother to make a starch, but this would be great over a bed of noodles or with a side of mashed potatoes.
Introducing: The Beast; aka How to Protect Your Garden
Dun Dun Dun...................
Without too much effort, we think we have protected our plants from any potential garden monsters :) Chicken wire: We acquired some for free
PVC and dowels: $5.78
I now present to you The Beast (actually, The Beasts, since we found out there are 2):

Turns out we have some visitors who like to frequent our yard. Actually, I think they live in our yard somewhere, we usually see them on a daily basis. They are part of the reason our grass looks like crap.
While they look cute and harmless, we didn't want these fuzzy buddies to wreak havoc on our garden, so we had to build a cage. For the garden, not for the bunnies.
We picked up some chicken wire, and Josh got this fabulous idea on how to install it. He inserted lengths of PVC pipe into the corners of the garden and on the long side, then stood up dowels in the pipe. We wrapped the chicken wire around the garden and secured it around the dowels. When we each lift up each end, we can remove and replace the cage, somewhat easily. Hopefully these pictures explain it a little better.


PVC and dowels: $5.78
Total to date: $93.75
Sunday, June 28, 2009
SWE cookies
More fun with royal icing. Practice makes perfect with this stuff; the more I work with it, the better I get! I am involved with the local Society of Women Engineers section here, and I needed to bring a dessert for a meeting we were having. Here is the logo: And here are my cookies!

 I used this sugar cookie recipe, and the royal icing recipe from here, as always!
 And here are my cookies!
 I used this sugar cookie recipe, and the royal icing recipe from here, as always!
Friday, June 12, 2009
Playing in the Dirt: Part III
Finally, we plant. I used this tool to help us lay out the garden. It tells you how many of each plant you can put in each square foot, which was easier for us to lay out. We measured and marked one-foot spacing on the inside of the box, and estimated from there. We left 2 cells empty in case we wanted to plant an/or move something else later.
 I grew a lot of the seedlings too close together in the peat moss containers. The sprouts were too dense of most of them to just plant the whole container, and they were too fragile to separate individually. We did our best, but ended up scrapping the lettuce and starting over. Most of the herbs got transplanted in one big lump. We also planted some spinach, squash and watermelon seeds directly into the garden.
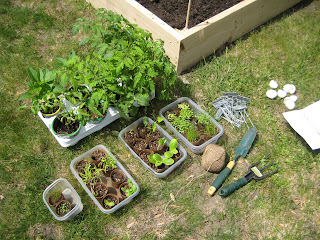


I found these cute (waterproof) signs in the dollar section at Target and used them to label each plant.


Other tips and tricks:
* We dropped a few eggshells in the holes we dug for the tomato plants. The calcium is supposed to make their stalks nice and strong.
* Some plants need support. We got a cage for each of our tomato plants so that they would grow upward. (Ours are 33", 3-ring, 3-leg.)
* Water the newly planted garden well, especially for the first 24-48 hours.
* Be careful when planting seeds to not "drop" any. We have a few surprise sprouts around our garden, and we are pretty certain its because I got careless while handling the seeds :/
Total spent in this post:
Plant signs 5 packs of 5 @ $1.00/pack = $5.00
Tomato cages 4 @ $1.68 ea = $6.72 (included a 10% off coupon from Lowes
Tomato cages 2 @ $0.79 ea = $1.58 (we had to get 2 more, and they happen to be cheaper at Aco)
Total to date: $87.97
And Josh admiring our hard work:

 I grew a lot of the seedlings too close together in the peat moss containers. The sprouts were too dense of most of them to just plant the whole container, and they were too fragile to separate individually. We did our best, but ended up scrapping the lettuce and starting over. Most of the herbs got transplanted in one big lump. We also planted some spinach, squash and watermelon seeds directly into the garden.


I found these cute (waterproof) signs in the dollar section at Target and used them to label each plant.


Other tips and tricks:
* We dropped a few eggshells in the holes we dug for the tomato plants. The calcium is supposed to make their stalks nice and strong.
* Some plants need support. We got a cage for each of our tomato plants so that they would grow upward. (Ours are 33", 3-ring, 3-leg.)
* Water the newly planted garden well, especially for the first 24-48 hours.
* Be careful when planting seeds to not "drop" any. We have a few surprise sprouts around our garden, and we are pretty certain its because I got careless while handling the seeds :/
Total spent in this post:
Plant signs 5 packs of 5 @ $1.00/pack = $5.00
Tomato cages 4 @ $1.68 ea = $6.72 (included a 10% off coupon from Lowes
Tomato cages 2 @ $0.79 ea = $1.58 (we had to get 2 more, and they happen to be cheaper at Aco)
Total to date: $87.97
And Josh admiring our hard work:

Thursday, June 11, 2009
Go WINGS!!!
Ok, so I know I'm seriously behind in blog posts. I promise to catch up in the next week or so. In the meantime..... GO WINGS!!!!!!!!!!!!!!!!!!!!!!!!!!

In honor of the Detroit Red Wings, who are playing the Pittsburg Penguins tomorrow night in game 7 for the Stanley Cup, I need to make sure I got these posted:

 Josh wants to make it perfectly clear that he did NOT support me only making 9 cookies. He wanted one for every player on the bench. I told him that in 2.5 hours, that wasn't happening. He was distraught for minutes while he determined what list of names to give me. He wasn't happy about that.
I used my go-to cut-out cookie recipe and the same Royal Icing recipe I usually use. They are far from perfect... We had friends over to watch Game 1, and I was still decorating them when the game started - so I was in a hurry.
More posts, including more practice with royal icing, coming soon!

In honor of the Detroit Red Wings, who are playing the Pittsburg Penguins tomorrow night in game 7 for the Stanley Cup, I need to make sure I got these posted:


 Josh wants to make it perfectly clear that he did NOT support me only making 9 cookies. He wanted one for every player on the bench. I told him that in 2.5 hours, that wasn't happening. He was distraught for minutes while he determined what list of names to give me. He wasn't happy about that.
I used my go-to cut-out cookie recipe and the same Royal Icing recipe I usually use. They are far from perfect... We had friends over to watch Game 1, and I was still decorating them when the game started - so I was in a hurry.
More posts, including more practice with royal icing, coming soon!
Thursday, June 4, 2009
Playing in the Dirt: Part II
Here is the much anticipated follow-up to Part I. You were just waiting on the edge of your seat for this, right?
 We let our seeds/plants grow for about a month. Josh diligently watered them, took them outside on warm sunny days, and babied the heck out of them.
He is seriously ready for a dog. Our plants are spoiled by all the attention they got.
We decided to plant them Memorial Day weekend (May 23rd), since the weather was consistently staying a bit warmer. I read you should wait until it is consistently above 50 deg F at night as a guideline. I didn't want to wait until July, so we gave it the go-ahead.
First, we prepared the area.
 We wanted to try and reduce the weed growth, so we cleared the grass and weeds from the area for our raised bed. I tried to loosen the ground up a little bit, but this wasn't too important since we aren't planting any root vegetables.
Second, we built our raised bed.
How hard can it be to build a rectangular box? Wrong question.
How hard can it be for 2 engineers to agree on how to build a box? Well... Josh and I didn't exactly see eye to eye on this one. Tears may have been shed (but only a couple, and only because crying helps me get my way).
The process is apparently much too complicated for me to explain here. I'll run through our supplies, links to other posts explaining how it could be done, and the finished product. There is not enough room on this blog to explain Josh's "common sense" approach, because it made no sense to me. And we ended up doing it mostly my way anyways.
 After a not-so-quick trip to Lowe's (we had a 10% off coupon), we had the following:
(3) 2x10" boards, 8 ft long, untreated**; one board cut in half for free ($14.19)
(1) 1 lb. box 3" exterior screws ($6.95) - we had plenty left over
(1) bundle of 18" stakes (we had these in the garage)
** I have received conflicting information regarding the kind of wood to get. Pine or cedar seem to be good choices, but can be expensive. We went with untreated lumber because I didn't want any chemicals leaching into the soil and contaminating the soil and plants.
You might find these or these instructions helpful. I thought we did, but Josh had his own ideas. (Its my blog, I can pick on him if I want to :) ) And here is our pretty box:
Third, we added the dirt.
 Who came up with the saying "Dirt cheap." anyways? Cuz, uh, dirt ain't cheap.
After asking around, we determined that the compost we acquired was pretty good dirt and we didn't need to add too much to it. I estimated we needed 22 cubic feet of dirt, but we didn't have enough. I wanted to supplement with some nutrient rich planting soil, so we picked up some of the Miracle-Gro stuff at Lowe's, and when that still wasn't enough, I grabbed 2 more bags of potting soil with peat moss from the local flower shop.
 (2) bags Miracle-Gro Flowers and Vegetable Garden Soil, 2 cu. ft. each ($12.69)
(2) bags Potting Soil with peat moss, 40 lb. each ($6.58)
We just dumped all the dirt in and mixed it around really good. Easy peasy. And dirty. All ready for plants. Which, I think I'll make a separate post. This is LONG enough. Thanks for sticking with me!
Cost summary:
Raised bed subtotal: $21.14
Dirt subtotal: $19.27
Total to date: $74.67 (includes first post)
 We let our seeds/plants grow for about a month. Josh diligently watered them, took them outside on warm sunny days, and babied the heck out of them.
He is seriously ready for a dog. Our plants are spoiled by all the attention they got.
We decided to plant them Memorial Day weekend (May 23rd), since the weather was consistently staying a bit warmer. I read you should wait until it is consistently above 50 deg F at night as a guideline. I didn't want to wait until July, so we gave it the go-ahead.
First, we prepared the area.
 We wanted to try and reduce the weed growth, so we cleared the grass and weeds from the area for our raised bed. I tried to loosen the ground up a little bit, but this wasn't too important since we aren't planting any root vegetables.
Second, we built our raised bed.
How hard can it be to build a rectangular box? Wrong question.
How hard can it be for 2 engineers to agree on how to build a box? Well... Josh and I didn't exactly see eye to eye on this one. Tears may have been shed (but only a couple, and only because crying helps me get my way).
The process is apparently much too complicated for me to explain here. I'll run through our supplies, links to other posts explaining how it could be done, and the finished product. There is not enough room on this blog to explain Josh's "common sense" approach, because it made no sense to me. And we ended up doing it mostly my way anyways.
 After a not-so-quick trip to Lowe's (we had a 10% off coupon), we had the following:
(3) 2x10" boards, 8 ft long, untreated**; one board cut in half for free ($14.19)
(1) 1 lb. box 3" exterior screws ($6.95) - we had plenty left over
(1) bundle of 18" stakes (we had these in the garage)
** I have received conflicting information regarding the kind of wood to get. Pine or cedar seem to be good choices, but can be expensive. We went with untreated lumber because I didn't want any chemicals leaching into the soil and contaminating the soil and plants.
You might find these or these instructions helpful. I thought we did, but Josh had his own ideas. (Its my blog, I can pick on him if I want to :) )
 And here is our pretty box:
Third, we added the dirt.
 Who came up with the saying "Dirt cheap." anyways? Cuz, uh, dirt ain't cheap.
After asking around, we determined that the compost we acquired was pretty good dirt and we didn't need to add too much to it. I estimated we needed 22 cubic feet of dirt, but we didn't have enough. I wanted to supplement with some nutrient rich planting soil, so we picked up some of the Miracle-Gro stuff at Lowe's, and when that still wasn't enough, I grabbed 2 more bags of potting soil with peat moss from the local flower shop.

 (2) bags Miracle-Gro Flowers and Vegetable Garden Soil, 2 cu. ft. each ($12.69)
(2) bags Potting Soil with peat moss, 40 lb. each ($6.58)
We just dumped all the dirt in and mixed it around really good. Easy peasy. And dirty.
 All ready for plants. Which, I think I'll make a separate post. This is LONG enough. Thanks for sticking with me!
Cost summary:
Raised bed subtotal: $21.14
Dirt subtotal: $19.27
Total to date: $74.67 (includes first post)
Subscribe to:
Posts (Atom)