Wednesday, September 30, 2009

Tilapia Parmesan

Josh was in charge of dinner tonight, so he found this recipe on allrecipes and put it together. We used 1 lb of tilapia fillets but Josh still made all the sauce - it was definitely too much topping, but it was delicious! Good job babe!

Tilapia Parmesan
adapted from Allrecipes; serves 4 as written

1/2 c. Parmesan cheese (we used reduced fat)
2 Tbsp. butter, softened
3 Tbsp. mayonnaise (we used light)
2 Tbsp. fresh lemon juice
1/4 tsp. dried basil (we recommend fresh if you have it!)
1/4 tsp. garlic powder
1/4 tsp. ground black pepper
1/8 tsp. salt
2 pounds tilapia fillets

DIRECTIONS:
1. Pan fry the tilapia fillets in a little olive oil over medium heat for a couple minutes on each side. (You could also broil them if you prefer)
2. In a small bowl, mix together the Parmesan cheese, butter, mayonnaise and lemon juice, dried basil, pepper, garlic powder and salt. Mix well and set aside.
3.
Cover the tilapia with the Parmesan cheese mixture on the top side. Place under broiler for 2-3 minutes or until the topping is browned and fish flakes easily with a fork. Be careful not to over cook the fish.

REVIEW:
This was very yummy, and quick to put together since we paired it with a bag of microwave veggies. We cut the butter in half from the original recipe and used low fat mayo and cheese to make it a little healthier. You could certainly play with the spices a little more to get other flavors you enjoy in there. Heck, if you don't like fish, try this topping on some chicken breasts.

Protein-Packed Pumpkin Pancakes

I had a can of pumpkin in my pantry that I have been anxious to use, and since fall has pretty much set in, it was time! After a long run or workout session, I try to eat a good helping of protein to repair my muscles. I don't usually crave eggs, so these pancakes are a great substitute. I adapted an oatmeal pancake recipe slightly by adding pumpkin to it.

Pumpkin Pancakes
adapted from the South Beach Diet Cookbook, by Dr. Arthur Agatston

1/2 c. old-fashioned oatmeal
1/4 c. low fat (or fat free) cottage cheese
4 egg whites
1 tsp. vanilla extract
1/2 tsp.pumpkin pie spice (OR add 1/4 tsp. cinnamon and 1/4 tsp. nutmeg)
1/2 c. pure pumpkin puree

DIRECTIONS:
1. Preheat griddle.
2. Process all ingredients in a blender until smooth.
3. Cook 1/4-1/2 c. at a time over medium heat, flipping half way though, until lightly browned and cooked though.

REVIEW:
Love these! This whole recipe serves 1 - so it is VERY filling, and contains 328 calories and is packed with 30 grams of protein, plus 10 grams of fiber. Since this recipe contains virtually NO sugar (just a tad from the pumpkin), I topped with some light Cool Whip and sugar-free syrup to satisfy my sweet tooth. If this isn't your style, try adding some pumpkin puree to your favorite pancake batter - the puree is a little think, so thin your batter slightly if necessary.

Tuesday, September 29, 2009

Homemade Marinara Sauce

Shhh..... I have a secret to share with you. My Dad makes this fabulous spaghetti sauce, though its actually a meat sauce with meatballs. The meatballs are the really special part, but the sauce isn't so shabby either. I'll save the meatballs for another day.We had such a surplus of tomatoes from the garden, I needed to do something with them. I whipped up a batch of the family-recipe-sauce (minus the meat) to freeze, replacing the canned tomatoes with fresh romas from the garden. If you want to use fresh tomatoes, you will need to skin and seed them first. This task was a little tedious since my romas were so small - I had so many to do! To make peeling the tomatoes easier, place them in boiling water for a couple minutes until the skins start to crack, then move them to a bowl of cold water. The skins should peel right off. I then cut them in half and thumbed out the guts/seeds, and dropped them in the blender.

The seasoning below is approximate - my dad doesn't know exactly what quantities he adds, and I just estimated based on the below amounts. So season to your own tastes! This recipe made 12 cups of sauce for me - I froze them in Ziploc bags, 2 cups per bag. I'll be submitting this recipe to Joelen's Tasty Tools Event for September, which features stock pots!

Homemade Marinara Sauce
family recipe, makes approx. 12 cups

1 large + 1 small can tomato paste
1 large + 1 small can water
4 large cans whole tomatoes, blended (I used ~14 cups fresh roma tomatoes)
2 Tbsp. italian seasoning
2 tsp. oregano
2 tsp. basil (I had fresh on had, so I tossed in a few tablespoons)
2 bay leaves (remove before freezing/serving)
2 tsp. parsley
salt to taste
freshly ground black pepper to taste

Optional: add 1/4 cup parmesan cheese to sauce
Optional: saute some onion/garlic/green pepper in a little olive oil and add if desired

DIRECTIONS:
1. Combine tomato paste and water in a large stock pot and stir over medium heat for 30 minutes.
2. Add tomatoes and spices. Cook uncovered over low heat for 2 1/2 hours, stirring occasionally. (I placed the lid kind of half-on to try and minimize the sputtering mess this can make...)
3. Remove bay leaves. Add parmesan cheese, and garlic/green pepper/onion if using.
4. Serve or freeze. (This probably could be canned also if you look up directions for canning a similar type of recipe.)

REVIEW:
There is nothing quite like homemade marinara sauce! The only think I added to this batch was the parmesan cheese, but you can always add some sauted veggies or meat/meatballs before serving. Also, if you like a chunky sauce, only blend half the tomatoes and leave the other half diced. Enjoy!

Squash and White Bean Soup

I saw this recipe in a Real Simple magazine, and it was perfect for the cooler, overcast day we had today. I really like incorporating seasonal fruits and vegetables into my meals, and butternut squash were already on sale at my grocer. The flavors in this soup we kind of subtle, and Josh found it a little bland, but I really liked it and am looking forward to the leftovers!

Butternut Squash and White Bean Soup
source: Real Simple; serves 4

1 tablespoon olive oil
1 onion, chopped
1 14.5-ounce can diced tomatoes (I roughly chopped about 2 cups fresh tomatoes from my garden)
1 small butternut squash, peeled and cut into 1/2-inch pieces (~4 cups)
1 tablespoon fresh thyme
1 1/2 tsp. kosher salt
1/4 tsp. black pepper
5 c. water
2 15-ounce cans cannellini (great northern) beans, rinsed (I used a 24 oz jar)
1 bunch spinach, thick stems removed (~4 cups)

DIRECTIONS:
1. Heat the oil in a Dutch oven (or stock pot) over medium-high heat. Add the onion and cook, stirring often, until soft, 5 to 6 minutes. Add the tomatoes and their juices and cook, stirring occasionally, for 3 minutes.
2. Stir in the squash, thyme, 5 cups water, salt and pepper and bring to a boil. Reduce heat and simmer until the squash is tender, about 15 minutes (mine took about 25 min to be tender enough for me). Stir in the beans and spinach and cook until the spinach is wilted and the beans are heated through, 2 to 3 minutes.

REVIEW:
Since Josh thought this was a little too bland, next time I will try subbing at least half the water for vegetable stock to see if that helps. I served with imitation Red Lobster biscuits, though real Simple suggested some parmesan biscuits. I liked the fact that the soup itself was quite healthy and contained lots of veggies!

Saturday, September 19, 2009

We have a WINNER!

and the winner of a copy of Ron Douglas's America's Most Wanted Recipes is...

#3 Lindsey!

Congrats! I will be emailing you to get your address for shipping :) Thanks to all who entered and especially those who are now following my blog!

Friday, September 18, 2009

Last chance!

Today is the last day to sign up for my GIVEAWAY of a copy of
America's Most Wanted Recipes by Ron Douglas.
Sign up by midnight!

Wednesday, September 16, 2009

Chocolate Peanut Butter Cake

Josh asked for a Red Wings cake for his birthday. Hmmm..... I got to thinking, and really, I didn't want to make this too complicated. I settled on just putting the winged wheel on top of a layer cake - which was tricky enough. To do this, I printed out a copy of the logo, and traced the reverse outline with some piping gel. I then flipped this over on the cake the get the outline, and filled in the design freehand. I started with a white background, then filled in the detail with red and outlined the whole design in red. I think I used a #2 tip for the design, and used Wilton buttercream for the red and white icing. I thinned it a bit too much - the red started to bleed a little when it got warm.

As for the cake - Josh loves Reese's, so I knew I wanted to find a chocolate-peanut butter recipe. I settled on this one from Smitten Kitchen, but only used the cake and peanut butter filling parts, since I needed a firmer icing on my cake. I went with my stand-by chocolate frosting to pack in as many calories per slice as possible ;) It was absolutely delicious. Small slices and glass of milk required.

Sour Cream-Chocolate Cake with Peanut Butter Filling
Adapted from Smitten Kitchen
I made a 9" double layer cake; serves 12 to 16

For the cake:
2 c. all-purpose flour
2 1/2 c. sugar
3/4 c. unsweetened cocoa powder, preferably Dutch process
2 tsp. baking soda
1 tsp. salt
1 c. neutral vegetable oil, such as canola, soybean or vegetable blend
1 c. sour cream
1 1/2 c. water
2 tbsp. distilled white vinegar
1 tsp. vanilla extract
2 eggs

DIRECTIONS:

1. Preheat the oven to 350 degrees F. Butter the bottoms and sides of two 9-inch round cake pans. Line the bottom of each pan with a round of parchment or waxed paper and butter the paper. (I just buttered and floured the pans.)

2. Sift the flour, sugar, cocoa powder, baking soda, and salt into a large bowl. Whisk to combine them well. Add the oil and sour cream and whisk to blend. (Whisk is an interesting verb here - it is thick at this point!) Gradually beat in the water. Blend in the vinegar and vanilla. Whisk in the eggs and beat until well blended. Scrape down the sides of the bowl and be sure the batter is well mixed. Divide among the 2 prepared cake pans.

3. Bake for 30 to 35 minutes, or until a cake tester or wooden toothpick inserted in the center comes out almost clean. Let cool in the pans for about 20 minutes. Invert onto wire racks, carefully peel off the paper liners, and let cool completely. (These cakes are very, very soft. I found them a lot easier to work with after firming them up in the freezer for 30 minutes. They’ll defrost quickly once assembled. You’ll be glad you did this, trust me.)

For the Peanut Butter Filling:
(Makes about 5 cups - I only made 1/2 this recipe since I only used it as the filling between layers)
10 ounces cream cheese, at room temperature
1 stick (4 ounces) unsalted butter, at room temperature
5 c. confectioners’ sugar, sifted
1 c. smooth peanut butter, preferably a commercial brand (because oil doesn’t separate out)

4. In a large bowl with an electric mixer, beat the cream cheese and butter until light and fluffy. Gradually add the confectioners’ sugar 1 cup at a time, mixing thoroughly after each addition and scraping down the sides of the bowl often. Continue to beat on medium speed until light and fluffy, 3 to 4 minutes. Add the peanut butter and beat until thoroughly blended.

For the frosting:
1 recipe Hershey's Perfectly Chocolate Frosting, or Frosting of your choice
** For the piping design, I used 1/4 recipe Wilton buttercream icing, thin consistency with a little piping gel mixed in

5. To frost the cake, place one layer, flat side up, on a cake stand or large serving plate. Spread the Peanut Butter Frosting evenly over the top. Place the second layer on top and frost the top and sides of the cake with the chocolate frosting.

6. Decorate the cake as you wish!REVIEW:
Yes, this cake is rich. Yes, I know this cake is not healthy. It is a special birthday treat. And it was very good. And in some ways I am glad my in-laws didn't take seconds and left Josh and I with plenty of leftovers. Happy 29th Birthday babe! Sorry I ate so much of your cake!

Tuesday, September 15, 2009

Vegetable Tian

We have eaten LOTS of zucchini, squash, and tomatoes this summer, thanks to our garden and our farmers market. This is an very simple and adaptable side dish to incorporate a variety of veggies for dinner. The presentation can be made very elegant, and it tasted delicious!Vegetable Tian
from Annie's Eats, originally adapted from Ina Garten
serves 4-6; though vegetable amounts are approximate based on your baking dish - get a larger dish and you can layer more vegetables in there!

Olive oil
2 large yellow onions, cut in half and sliced (I omitted)
2 garlic cloves, minced
1 lb. medium round potatoes, unpeeled (I used yellow summer squash instead)
3/4 lb. zucchini
1 1/4 lb. medium tomatoes
1 tsp. kosher salt
1/2 tsp. freshly ground black pepper
1 tbsp. fresh thyme leaves, plus extra sprigs
2 oz. Gruyere cheese, grated (I used Parmesan - the cheap stuff in the can, and probably a little too much ;)

DIRECTIONS:
1. Preheat the oven to 375 degrees. Brush a 9×13″ baking dish with olive oil. Heat 2 tablespoons olive oil in a sautĆ© pan, and cook the onions over medium heat until translucent, about 8-10 minutes. Add the garlic and cook for another minute. Spread the onion mixture on the bottom of the baking dish.

2. Slice the potatoes, zucchini, and tomatoes in 1/4-inch thick slices. Layer them alternately in the dish on top of the onions, fitting them tightly, making only one layer. Sprinkle with the salt, pepper, thyme leaves, and thyme sprigs. Drizzle with 1 more tablespoon of olive oil, if desired. Cover the dish with aluminum foil and bake for 35-40 minutes, until the potatoes are tender. Uncover the dish, remove the thyme sprigs, sprinkle the grated cheese on top , and bake for 30 minutes more, or until browned. Serve warm. (I didn't have to cook mine nearly as long because I didn't have potatoes and those take longer - I think I only put it back in for 15 min.)

REVIEW:
I love roasted vegetables, and this was a lovely side dish full of COLOR. A great way to use up those garden veggies!

Elephant Ears

I was craving a sweet treat a few weeks ago, and since we skipped all of the local fairs this summer, I thought these easy elephant ears I saw on Molly's blog would do the trick.

Elephant Ears
source: Thrifty Fun

Refrigerated biscuits - 1 roll (I used lowfat buttermilk biscuits, there were 8 in the tube)
1 c. cooking oil
1/2 c. cinnamon sugar (I made a mix of 1/2 c sugar and 1 tbsp cinnamon)
Paper lunch bag

DIRECTIONS:
1. Place cinnamon sugar in paper lunch bag. Heat cooking oil in large frying pan. Test for hot enough: Drop of water will sizzle.

2. Separate dough into individual biscuits-"ear". Stretch each biscuit until they just about have holes in them. They do not have to be perfect. Gently drop each "ear" into the hot oil. As soon as one side becomes golden, flip them and let second side get golden. DO NOT WALK AWAY. They burn quickly (mine took maybe a minute to 90 seconds on each side).

3. Place "ears" on paper towel to soak up excess oil. Shake "ears" in paper bag of cinnamon sugar. Serve warm with ice cream or just plain. Make lots, they will go quickly.REVIEW:
YUM!!! So easy! And these would be so much fun to make with kids. Plus - they are VERY inexpensive. I bet my 8 elephant ears cost me maybe $2.50, since I bought the rolls on sale.

Monday, September 14, 2009

Great American Taste Test: Macaroni Grill Focaccia Bread and a GIVEAWAY!

This GIVEAWAY is now closed.

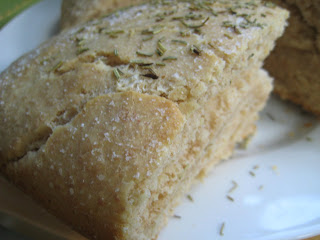
A while back, I signed up to participate in the Great American Taste Test - it is a publicity event for Ron Douglas's new book America's Most Wanted Recipes. Ron reveals copycat versions of restaurant favorites so that families can now enjoy the meals they love most at prices they can afford. The book includes favorites from Olive Garden, KFC, Cheesecake Factory, Red Lobster and PF Changs, among others.I was tasked with making one of the recipes and comparing to the original dish from the restaurant. There were lots of dishes I wanted to try - but we have limited restaurant options around here, and then our restaurants didn't carry some of the dishes any longer. So after much indecision, I settled on making Macaroni Grill Focaccia Bread. This is Josh's and my FAVORITE restaurant bread. I have been trying to avoid the excess carbs lately, but after a long run this morning, I deserved a treat :)Macaroni Grill Focaccia Bread
from America's Most Wanted Recipes by Ron Douglas; serves 8

1/2 c. olive oil, divided
3 c. all-purpose flour
3/4 c. semolina flour
1/2 tsp. salt
1 1/2 Tbsp quick-rising dry yeast
1 1/2 c. hot milk (120-130 deg F)
1 Tbsp fresh rosemary leaves

DIRECTIONS:
1. Pour 1 1/2 tsp. of olive oil into a 9" square cake pan (I used a glass pan), spread to cover the bottom and sides. Lightly dust with a little flour.
2. Place the ap flour, semolina flour, 2 Tbsp of olive oil, 1/4 tsp of salt, and all of the yeast into the bowl of a mixer fitted with a dough hook (or you can mix by hand).
3. Mix on medium speed until all the ingredients are blended. Reduce the speed to low and slowly add the hot milk. Increase the speed to medium and continue mixing for 5 minutes, then knead for about 10 minutes by hand.
4. Remove the dough from the bowl and spread evenly in the pan. Cover with a towel and let rise for 30 minutes.
5. Preheat oven to 400 deg F.
6. Remove the towel and brush the dough with 1-2 Tbsp olive oil. Top with remaining salt and fresh rosemary leaves. Bake for 20 minutes.
7. Remove from oven and drizzle with a little olive oil (we prefer some on a plate for dipping). Enjoy!

REVIEW:
This bread was very good. We had spinach pesto pasta with grilled chicken for dinner, and enjoyed some of the bread on the side with a plate of olive oil and balsamic vinegar or dipping. While this recipe was similar to the original, it wasn't exact. The flavors were there, but this recipe was much more dense. The Macaroni Grill bread is definitely more airy - J and I usually have no problem polishing off a loaf at the restaurant, but we could barely manage sharing a similar size portion of this recipe. I do want to try some of the other recipes in the book though, even if I don't have the original dishes to compare them too. We don't go out to eat very much and I do enjoy cooking when I have the time, so this book is a great resource to try dishes we wouldn't otherwise have.

Now for the fun part: I'm giving away a copy of America's Most Wanted Recipes to one lucky reader!

I accidentally received two copies from the publisher, and they gave me the go-ahead to give the other one away (Thanks Atria Books!).

So here's the drill:
Leave me a comment telling me one restaurant dish you would love to be able to duplicate at home by 11:59pm on Friday Sept. 18, 2009 (based on comment time stamp).
***To earn an extra entry, become a Follower of my blog, and leave a second comment telling me you are a Follower. (If you are already a Follower, just leave a second comment saying so.)

Be sure to include your email if its not public on your profile. The winner will be randomly selected via www.random.org on Saturday.

Good luck!

Saturday, September 12, 2009

Check back Monday!

I'm playing catch-up again. Check back in the next couple days as I catch up on recipes, and on Monday, I will be announcing my FIRST GIVEAWAY!

Fajita Marinade

Every once in a while I'll pick up a steak for us to grill, and this time we decided to make fajitas. I looked around for a marinade and found this on Culinary Cafe, so I thought we'd give it a try. This turned out very good, but we aren't picky when it comes to Mexican!

Fajita Marinade

4-5 large garlic cloves, crushed
1/4 cup freshly squeezed lime juice
2 tsp salt
1 tbsp chili powder
1/2 tsp red pepper flakes
1/2 cup balsamic or red wine vinegar
2 tbsp dark soy sauce
1/4 cup fresh cilantro, chopped roughly

DIRECTIONS:
1. Mix all ingredients in a zippered bag. Add beef or chicken, marinate 4 hours for beef or at least 2 for chicken.
2. Grill for best results, or you could also broil.
3. We also grilled some peppers and onions, then sliced up the beef and made fajitas topped with cheese, tomatoes, sour cream and green onion.
REVIEW:
This meat was very flavorful, so I think the marinade is a winner with us. There are so many marinades out there though - we have a tendency to keep trying new things. I would like to try this one with chicken since I don't prefer to eat beef - sometimes my opinions are thrown by the cut of beef instead of the flavors.

Cookie-Brownies

J and I were headed to a family barbecue, but we were visiting my parents first and I was looking for something very simple to bring that didn't require me to tote a lot of ingredients around, or keep things cool (this was one of 2 hot days in Michigan this summer).

I had some packaged baking goods in my pantry that I acquired on sale, and I remembered seeing these treats on the Bakerella blog awhile back. Seemed easy enough to me! I skipped the chocolate ganache topping because I didn't want the melty mess, and they were still yummy. So next time you can't decide if you should make the brownies or the cookies, I say, go with both!

Cookie-Brownies, aka Something I Really Shouldn't Be Eating
Thank You Betty Crocker for making this simple on us.

1 box brownie mix
1 bag cookie dough mix (or pre-made cookie dough from the refrigerator section of the store, or make your own from scratch if you want to)

DIRECTIONS:
1. Make brownies according to package directions. Pour into a greased 9x13" pan.
2. Make the cookie dough according to package directions. Drop by the tablespoon into the brownie batter, spacing them throughout the pan. Press down slightly so they are into the brownie batter a bit.
3. Bake in a 350 deg F preheated over for ~35 minutes.
4. If you think this isn't enough of a sugar high, frost with your favorite chocolate frosting or chocolate ganache. Cut into pretty small pieces. And for the sake of your waistline, only eat one. Or two. Per day.

Grilled Chicken with Pineapple-Mango Salsa

We are always looking for variations for our grilled chicken - we eat grilled chicken and veggies at least 3 times a week. Sometimes we just use a bottled marinade and toss the veggies on a skewer, other times I actually look for a recipe or marinade to use. Some of them have been duds - but this one was great! I had to add a mango to my usual shopping list, but we will definitely make this again!

Grilled Chicken with Pineapple-Mango Salsa
from Cooking Light, serves 4 as written

For the salsa:
2/3 cup diced peeled ripe mango (1 medium)
2/3 cup diced fresh pineapple
2 tablespoons minced red onion
1 tablespoon minced seeded jalapeƱo pepper
1 1/2 teaspoons chopped fresh cilantro
1 1/2 teaspoons fresh lime juice
1/8 teaspoon salt
1/8 teaspoon freshly ground black pepper

For the chicken:
4 (6-ounce) skinless, boneless chicken breast halves
1/4 cup pineapple juice
3 tablespoons chopped fresh cilantro
3 tablespoons low-sodium soy sauce
2 tablespoons honey
1 teaspoon fresh lime juice
Dash of crushed red pepper
Cooking spray

DIRECTIONS:
1. To prepare salsa, combine first 8 ingredients. Cover; refrigerate 30 minutes.

2. To prepare chicken, place each chicken breast half between 2 sheets of heavy-duty plastic wrap; pound to 1/2-inch thickness using a meat mallet or small heavy skillet. Combine pineapple juice and next 5 ingredients (through red pepper) in a large zip-top plastic bag. Add chicken to bag; seal. Marinate in refrigerator 30 minutes.

3. Prepare grill.

4. Remove chicken from bag, reserving marinade. Place chicken on a grill rack coated with cooking spray; grill 3 minutes on each side or until done.

5. Place reserved marinade in a small saucepan; bring to a boil. Reduce heat, and cook until reduced to 1/4 cup (about 5 minutes). Drizzle over chicken. Serve salsa with chicken.

REVIEW:
We loved this! I think we will put it in our regular rotation - the only drawback is that I don't normally have all the ingredients on hand. I didn't put any extra sauce on my chicken, and I didn't even miss it. The salsa adds the perfect flavor, especially for summer grilling season. And the best part - its a light dinner! Per serving (1 chicken breast and 1/4 c salsa) - 222 cals and 26g protein! I served with grilled zucchini (brushed with a little olive oil and salt) to round out the healthy meal.

Look at Our Garden Grow!

The compost in Bay City must be above average. Or my Josh is just an outstanding water-er. Either way, our garden is out of control this year! The single most important thing we've learned: WE NEED MORE SPACE! We managed to severely over-crowd our plants, and our lettuce, spinach, and herbs suffered. Regardless, watch how our garden grew this summer:

May 23, when we first planted:
June 20: At this point, we were enjoying cilantro, parsley, and spinach.
July 5: Still enjoying the herbs, lettuce and spinach.
August 2: The vegetables are starting to ripen. Throughout the month of August (and so far into September), we have had:

Jalapeno peppers

Bell peppers (its taking a while for the colored peppers to change color though...)


Zucchini - some as big as my forearm! (Though our squash didn't fair as well)
And tomatoes. Oh the TOMATOES! There are just SO many. We have given them away, grilled them, eaten them raw, made a freezer stash of tomato sauce, and tomorrow, I will be trying my hand at canning. They taste sooooo good!
We have also enjoyed some cucumbers, and are still waiting for our colored peppers to turn. I'm sure I'll have at least one more garden update (with a little surprise in it!) before the season is over.