Friday, May 29, 2009

Strawberry Swiss Roll

I wanted to bring my mom a treat for Mother's Day, and I had some strawberries to use up. I debated making the strawberry cake I made a few weeks ago, but I really didn't have the time to decorate it. I found this on Cate's blog, and used fresh berries for the filling. It was quite quick to make, looks fancy, and tasted light and delicious!
Strawberry Swiss Roll
from Baking From My Home to Yours by Dorie Greenspan

1 1/2 c. sugar
1 c. all purpose flour
1 tsp baking powder
1 tsp baking soda
1/4 tsp salt
4 large eggs, separated
1/2 c. vegetable oil (I used unsweetened applesauce)
1/2 c. water
2 Tbsp vanilla extract
2 large egg whites
1/2 cup jam of your choice (I used pureed strawberries, thicken with a little cornstarch on the stovetop - bring to a boil for 2-3 minutes, then cool before using)

DIRECTIONS:
1. Preheat the oven to 350 F. Line a 17 1/2 by 12 1/2 inch jelly roll pan with parchment and spray well with nonstick spray.
2. Sift together 1 cup of sugar, the flour, baking powder, salt and baking soda onto a piece of waxed paper.
3. In a large bowl, whisk together the yolks, oil, water, and vanilla. Whisk in the dry ingredients gradually and set aside.
4. Beat the 6 egg whites with the whisk attachment of a stand mixer on medium until very soft peaks form. Gradually add the remaining sugar, and turn up to high. Beat until the peaks are stiff and shiny.
5. Fold about a third of the whipped whites into the yolk mixture, then transfer all the batter into the whites and fold thoroughly (but gently).
6. Pour into the pan and spread evenly. Bake for about 12 minutes, or until it pulls away from the sides and is just turning golden.
7. Cool the cake in the pan on a wire rack.
8. When cool, dust the cake with powdered sugar, cover with wax paper, and put the back of a sheet pan on top. Flip over, and remove the parchment from the cake. Cover the bottom of the cake with wax paper, then invert the jelly roll pan on the cake and flip over again, so the cake is on the inverted jelly roll pan with wax paper on the bottom.
9. Trim the edges, and turn the cake so that a long side is facing you. (I didn't trim the edges of mine, I waited until after I rolled it and ate the ends as samples!)
10. Spread with jam (or whatever fruit filling you are using) and roll up, using the wax paper to help. **You want a fairly thin layer of jam, or else it will all squirt out as you roll** Lift the cake by the paper and place on a tray. Chill for about 30 minutes.
11. Dust with powdered sugar before serving. Enjoy!REVIEW:
This cake roll was awesome. Its the first Dorie recipe I have ever tried, and I think I will make more! I was intimidated by the recipe at first since I have never made a cake roll before, but the cake was perfectly flexible for rolling without cracking. I had to scoop out some of the filling as I was rolling it because it was obvious I over-filled it, but other than that, I have no problems. It was actually quite quick to make since it only bakes for 12 minutes. I highly recommend trying this recipe!

Frozen Fruit Cups

Here is one more freezer recipe I made for my cousin's family. These fruit cups are great - they are reasonably healthy, and great for a grab-and-go snack. Just let them sit out for ~15 min then enjoy! No cooking required, and they are very easy to make. Its a shame I didn't try one myself.
Frozen Fruit Cups
adapted from life clinic/Equal

1 8oz package fat-free cream cheese, softened
1 cup non-fat vanilla yogurt
1 Tbsp no-calorie sweetener
2-3 tsp. lemon juice
3-4 c. fruit, use any of the following: berries (blue/rasp/straw), mandarin oranges, peaches, pineapple (I used 1 cup canned peaches, 1 cup frozen blueberries, and 1 cup mandarin oranges)
12 pecan halves, optional

DIRECTIONS:
1. Beat cream cheese, yogurt, sweetener, and lemon juice together until smooth. Gently stir in fruit. (Mine look purple b/c I used frozen blueberries, and the juice colored the mixture.)
2. Spoon mixture into 12 paper lined muffin cups until full. Top with additional fruit and pecan halves if desired.
3. Freeze until firm, 6-8 hours. To serve, let sit out at room temp for 15 minutes to slightly soften, then enjoy!
REVIEW:
These looked good, and were very easy to put together. I'm hoping the kids liked them! I'll have to make these for myself at some point.

Wednesday, May 27, 2009

Spaghetti Pie

Here is another freezer meal I made for my cousin's family. It looked like a good spin on spaghetti that would be easy to freeze. Once again, I wish I had better pictures, but this is all I got...Spaghetti Pie
adapted from Missy at Freezer Friendz

1.5 lb. ground turkey (or beef)
10 oz. spaghetti (cooked al dente)
2 Tbsp. butter
1/2 cup grated Parmesan cheese
2 eggs (well beaten)
2 c. cottage cheese (I use low-fat)
1 24-28 oz. jar of your favorite spaghetti sauce
8 oz. grated mozzarella cheese (needed on serving day)

DIRECTIONS:
1. Spray a 9x13" pan with non-stick spray.
2. Cook spaghetti and drain. To the cooked spaghetti mix in the butter, Parmesan cheese, and eggs and form into a crust that covers the bottom of your 9x13 pan.
3. Spread the cottage cheese over your noodles.
4. Brown the turkey/beef and add to your favorite sauce then spread over the cottage cheese.
5. FREEZE (I covered with aluminum foil, then the pan lid.)

To SERVE:
Bake at 350 for 30 min. Add mozzarella cheese and put back in oven till it melts. Enjoy!

REVIEW:
This recipe made a lot of food - plenty for a family of 6. This recipe took a little longer to put together because of cooking the noodles and browning the meat; but the assembly was still simple. Josh really wanted to try this, so I might make it for us at some point. When I do, I will definitely add some Italian seasoning to the sauce, or maybe make the sauce from scratch. But for a freezer meal, the jarred was fine.

Cheesy Ham and Potato Pockets

I'm not usually one to make freezer meals, but there are a few recipes here that are ideal for freezing and eating later. My cousin just had her fifth child (under the age of 7!), and little Liam was a preemie. I decided I would take the family a few freezer meals to hopefully help out mom and dad in the early weeks. I tried to find things that would be kid friendly and easy to heat up, and these sounded like they fit the bill. (You'll have to excuse all the pictures... I didn't actually get to eat these!)
Cheesy Ham and Potato Pockets
from Tricia at Once a Month Mom; makes 8 pockets (I halved the recipe)

3/4 lb cooked ham, diced (I just chopped up some ham lunchmeat slices)
1 c. Swiss cheese, shredded (I used cheddar)
1/2 c. ranch dressing
2 c. frozen hash brown potatoes (I used shredded hash browns)
1/2 c. onion, diced
2 Tbsp margarine or butter
1/8 tsp garlic powder
2 cans refrigerator crescent rolls

DIRECTIONS:
1. Place 2 cups of frozen hash brown potatoes in microwaveable safe bowl and defrost for approximately 3 minutes.
2. In a small skillet, cook onions and hash brown potatoes in butter until warmed and slightly browned. Add garlic powder.
3. In a separate small bowl, mix together ham, Swiss cheese and ranch dressing.
4. On a cookie sheets spread out refrigerated crescent dough and pinch together triangle perforations to make 4 squares (if you using the non-perforated dough cut into 4 large squares).
5. Place 1/4 cup of potato mixture and 1/4 cup of ham mixture into the center of the crescent squares. (I just mixed the potato and ham mixtures together before adding it to the rolls.)6. Fold over dough and seal with a fork or pinch seams together with your fingers.
7. Place in 350 degree oven for 15-18 minutes or until lightly browned.

At this point, you can enjoy them, or...

FREEZING INSTRUCTIONS:
Let cool and then flash freeze (or place each in a small zipper sandwich bag) and place in a gallon size freezer bag. Freeze. To Serve: Place in microwave for 2-4 minutes OR in oven for 10-15 minutes until heated through.

REVIEW:
Well, these were very easy to make. Josh ate the extra filling and said it was good. I'll have to follow up and see if the kids liked them. I liked the fact that the pockets can be microwaved from frozen for a quick lunch or dinner without a lot of pre-planning.

Friday, May 22, 2009

Lemon Cupcakes with Lemon Cream Cheese Frosting

I was looking for a light, fresh cupcake to take to a friend who is in the hospital. I found a bunch of lemon cupcake recipes online, but I liked how much lemon this one had in it. It is so easy for flavors to get lost sometimes. These were good, and trust me, they were not too lemony! We have some to eat around here because I completely over-baked the first batch (the original recipe called for 30 min. My other batch was done in about 22!). Oh well, more for Josh to eat!Lemon Cupcakes with Lemon Buttercream
adapted from Tea Journal, makes ~24 cupcakes
frosting adapted from this post

1 cup of butter (2 sticks, room temperature)
2 cups sugar
4 eggs
3 Tbsp lemon zest (zest from 1 large lemon)
2 cups all purpose flour
1 cup cake flour (I used 1 c. ap minus 2 Tbsp., + 2 Tbsp. cornstarch)
1/2 tsp baking soda
1/2 tsp baking powder
1/2 tsp salt
1 tsp. lemon juice
3/4 cup milk
1 tsp vanilla extract
1 tsp lemon extract

Lemon Drizzle/Syrup:
Juice from 1 1/2 lemons
1/2 cup sugar

Lemon Cream Cheese Frosting:
1/2 c. butter, softened
8 oz cream cheese, softened (I used 1/3 less fat)
2-3 c. confectioners sugar
1 tsp. lemon extract
zest from 1/2 a lemon
1/2 a lemon sliced into small sections for garnish, optional

DIRECTIONS:
1. Preheat oven to 350 degrees F. Lightly spray muffin tins and dust with flour. Alternatively, you can line the tins with cupcake liners, however, there is a step that follows baking that can leave your cupcake liners somewhat sticky. If you don't mind sticky cupcake liners, then use the liners instead of spraying and flour dusting.

2. Cream butter and sugar together at medium speed for about 5 minutes. Do not skimp on this step, it greatly affects the texture of the cupcakes.

3. Add eggs, one at a time, to creamed mixture, blending well before adding another egg. Add lemon zest, and blend well, taking time to scrape down the sides of the bowl of your mixer and the mixer blade. The zest accumulated on the blade for me when I made these, so do make sure that you scrape the blade to make sure that the zest gets well incorporated.

4. Sift together flour, salt, baking soda and baking powder. In a different bowl, mix together the lemon juice, milk and vanilla and lemon extracts. Gradually add 1/3 of the flour mixture, blend, and then half of the lemon juice mixture, blend. Add another 1/3 of the flour mixture, blend, the last of the lemon juice mixture, blend, and finish up with the last of the flour mixture. Mix for about 20 seconds on medium speed, making sure that batter is well blended but do not over mix.

5. Scoop batter evenly into muffin tins, filling each cup about 2/3 full. (This makes about 24 cupcakes.) Bake at 350 degrees for about 20-25 minutes. Cupcakes are done when a wooden skewer inserted into the center of a cupcake comes out clean.

Now for the sticky part!

6. Juice 1 1/2 lemons, and pour into a small saucepan with 1/2 cup of sugar. Heat over medium heat until sugar is completely dissolved.

7. Using a wooden skewer, poke several holes into the crown of the cupcake. You should drive the skewer through to almost the bottom of the cupcake, as you want the syrup to be absorbed throughout the cake.

8. Now, spoon the lemon juice syrup over the cupcake. It is best to place the cupcakes on a cooking rack and place wax paper or newspaper underneath to catch the drippings. Allow the syrup to absorb into the cupcake. Allow the cupcakes to cool completely before frosting.

9. For frosting, mix butter and cream cheese until smooth. Mix in lemon extract and zest. Slowly add the powdered sugar until you get the desired sweetness.

10. I put my frosting in a bag and pipe in onto the cupcakes because I find it neater and easier this way (and faster too, actually). Top with a small slice of lemon for garnish if desired, or add some yellow sprinkles.

REVIEW:
Very yummy, the ones I didn't overbake were better. The cream cheese was a great pair with the light, lemon cakes. A tip: I don't think I made big enough "skewer holes." This was my first time using a simple syrup in a cupcake, and most of it ran off the top and dribbled down the sides. If the holes were a little bigger, more syrup would be absorbed by the cupcake. Make the holes near the center, and you will have no problems covering them up with frosting.

Monday, May 11, 2009

Enchilada Casserole

Josh and I were looking around for something to eat tonight. I had chicken defrosted, but no meal planned. We kind of combined our stand-by enchilada recipe, with some of the sauce that Annie uses in her recipe. This turned out pretty darn good! I decided to make it into a casserole since I thought that would be easier, and it cut down of the amount of tortilla we were eating (the filling is the good part!)
Enchilada Casserole
serves 4

2 smallish boneless skinless chicken breast halves (~3/4 lb)
1/2 c. chopped onion
1 (4 or 7 oz) can green chilis, optional
3 flour (or corn) 8" tortillas
lots of salsa (about 2 cups)
1 1/2 c. Mexican blend cheese (or cheddar would work too)
4 oz. light sour cream (I eyeballed it, about 1/4 of a 16 oz container)
4 oz. ranch dressing (again, I eyeballed it)
1 1/2 Tbsp chili powder
2 tsp garlic powder

DIRECTIONS:
1. Cook and shred chicken (I boiled mine). While cooking chicken, preheat oven to 375 deg F, and grease a square glass baking pan (either 8x8 or 9x9) with some cooking spray.
2. In a small bowl, mix sour cream and ranch dressing until combined.
3. Saute onion in a little oil until soft. Add chili powder and garlic powder, stir to combine.
4. Stir in chicken, green chilis, and half of the sour cream mixture. Stir for ~2 min, then remove from the heat.
5. Time to layer the casserole: Spread a little bit of salsa on the bottom of the pan (~1/4 cup, just so the bottom tortilla doesn't dry out). Place a tortilla in the pan (yes, the pan is square, so it doesn't fill the corners, but my casserole isn't perfect!). Spread a spoonful of the sour cream mixture on top of the tortilla. Pour half the chicken mixture into the pan, and spread until even. Top with a thin layer of salsa, spreading until even. Sprinkle with a layer of cheese. Now repeat: tortilla, spoonful of sour cream mixture, rest of chicken mixture, salsa, and cheese. Now top with one more tortilla, thin layer of salsa and the rest of the cheese.
6. Whew! Now bake for 30 min. Let set for 5 min before serving.
7. Top with sour cream/salsa/guacamole, and enjoy!REVIEW:
I've never had Annie's "Benchiladas", but I can only imagine they are good. We love our stand-by enchilada recipe, but I just didn't have all the ingredients, namely enchilada sauce. I didn't miss the sauce one bit in this casserole. It was pretty good if we do say so ourselves! If you are using a 9x13" pan, I would recommend using at least 1 1/2 times the ingredients. Oh, and at some point I will learn how to take a good picture of Mexican food.

PW's Whiskey Glazed Carrots

I have had my eye on this recipe from Pioneer Woman for a while, but didn't have the right occasion to make it. I needed to bring a side for a salmon-lunch for Mother's Day, so I decided I would make these. I really like how they are so colorful on a table and look very elegant.
PW's Whiskey Glazed Carrots
serves a crowd

2-3 lbs of carrots, peeled and sliced thick (I used a 2lb bag of the minis)
1 stick (1/2 c.) butter (yikes! I used 1/4 c. and that was enough)
1/2 c. whiskey (I used Jack Daniels)
3/4 c. brown sugar
1 tsp. salt
freshly ground pepper
fresh herbs for topping (chives are recommended; I used dried)

DIRECTIONS:
1. Melt 1 tablespoon butter in a large skillet over high heat. Add carrots in two batches, cooking for 60 to 90 seconds each batch so they are slightly seared. Remove from skillet.
2. Pour in whiskey and allow to evaporate 30 seconds. Reduce heat to medium, and add remaining butter. (Be careful whenever adding alcohol over an open flame!)
3. When butter melts, sprinkle brown sugar over the top.
4. Stir together, then add carrots to skillet. Cover, and continue cooking for 5 minutes.
5. Remove lid and add salt and pepper. Continue cooking until carrots are done and glaze is thick, about 5 more minutes.
6. Pour onto a platter and serve immediately. Sprinkle with chopped chives if desired.REVIEW:
These were good. The glaze was a little thinner than I expected, but I just poured it all in the serving bowl anyways. Steamed carrots are always better with a little brown sugar and whiskey!

Sunday, May 10, 2009

Ricotta Creme

Anyone who has tried the South Beach Diet has heard of these. If you are looking for a low-carb, sugar-free dessert this is it. I'm not doing South Beach right now, but I am always on the look out for desserts that won't bust my diet. I have a serious sweet tooth! These are a nice after dinner snack that (usually) satisfies my craving.There are a lot of ways to alter this dessert; my favorites are below.

Ricotta Creme, so many ways

adapted from the South Beach Diet book

1/2 c. low-fat Ricotta cheese
1 Tbsp. no-calorie sweetener (I use Splenda)

Plus:
Lemon: 1 tsp. lemon extract + 1/2 tsp. lemon zest
Pumpkin Pie: 1/2 tsp. pumpkin pie spice + a dollop of sugar free cool whip
Chocolate: 1 tsp. cocoa powder + 5 mini chocolate chips on top
Vanilla: 1 tsp. vanilla extract
Almond: 1 tsp. almond extract plus a few slivered almonds on top

DIRECTIONS:
1. Mix the ricotta cheese, sweetener, and spices or extracts together. Add toppings. Enjoy!REVIEW:
This is a really quick, easy treat. I love how it is so versatile to adjust the flavors. Other combos I want to try are cinnamon-sugar (just add a little more sweetener and 1 tsp. cinnamon, maybe a dash of nutmeg) and orange (orange extract and orange zest). The calories vary a little depending on what ricotta cheese you use, but are usually around 120 cals for a 1/2 c. dessert.

Saturday, May 9, 2009

Almond Rhubarb Coffee Cake

Rhubarb was on sale at the grocery store this week, so I picked some up. I have only baked with it once before when I made a pie, and since that was a success I wanted to try something different. I found a recipe on allrecipes, and made some changes based on the comments. I plan to bring one of these to Mother's Day lunch tomorrow, and the other to work on Monday. Josh and I shared an early piece - and it was really good!!!Almond Rhubarb Coffee Cake
adapted from allrecipes

Cake:
1 1/2 c. packed brown sugar
2/3 c. vegetable oil (normally I would sub applesauce, but didn't this time)
1 egg
1 tsp vanilla extract
1 tsp almond extract
2 1/2 cups all-purpose flour
1 tsp salt
1 1/2 tsp baking soda
1 cup milk (I used skim)
3 c. rhubarb, chopped

Topping:
1/3 cup white sugar
1 Tbsp cinnamon
1 tablespoon butter, melted
1/4 cup sliced almonds

DIRECTIONS:
1. Preheat oven to 350 degrees F (175 degrees C). Grease two 9 inch round pans.

2. In a large bowl, beat brown sugar, oil, egg, vanilla and almond extract together until smooth. Combine flour, salt and baking soda; add to sugar mixture alternately with milk. Beat until smooth. Stir in rhubarb. Pour into prepared pans.
3.
In a small bowl, combine white sugar, cinnamon, and butter. Stir in 1/4 cup almonds. Sprinkle topping over batter (using your fingers is easiest)
4.
Bake for 30 to 35 minutes, or until the cake tests done. REVIEW:
I was really happy with all of the changes I made to this recipes, especially increasing the amount of rhubarb and adding the almond extract! Rhubarb is quite tart, but it works so well in sweet cakes and pies to balance out the sweetness. Next time, I think I will try reducing the brown sugar a little, to about 1 1/4 c, since I still thought this was a tad to sweet and want the tartness of the rhubarb to come through a little more. It was also a little too crumbly, reducing the sugar might help with that (this could be caused by the extra rhubarb I used). I really liked how this made 2 9" cakes - you can certainly halve the recipe if you don't need quite so much food.

Salt and Sesame Bagels

I wanted to make a batch of bagels to give to a friend. I used the same recipe I used last time, but I used 4 c. all-purpose flour (instead of 2 c. ap and 2 c. wheat), and 1 Tbsp. sugar instead of the honey. I topped half with sesame seeds, and the other half with kosher salt (I would use a rock salt next time so the crystals are bigger). These turned out great (again)!

Our Veggie Garden: Playing in the Dirt Part I

Oh, my. What did we take on??? Its hard to tell, but that is the start of a vegetable and herb garden! Josh and I tossed around the possibility of starting a garden casually in conversation a few times: There is no good place to put it. Our soil isn't that great. Rodents are tearing up our grass, I can only imagine what they would do to a garden.... We pretty much talked ourselves out of it.

Then came Earth Day: Home Depot had a sale on plants (B1G1 Free!!), and the next thing I know, we are filling up our trunk with a cartful of starter plants and seed packets. Oh, I guess we are really doing this! I wanted to chronicle our gardening adventures for 2 reasons: 1. If it works, I want to remember what we did for next year; and 2. If we do get some good veggies and herbs out of this, then I guess anyone can do it, and I may even inspire some of you to try. These chronicles ended up on this blog because 1. We are growing veggies, so it is food related; and 2. I will undoubtedly lose a notebook by next year. So, bear with me through these posts!

What you need to know about gardening: nothing. We didn't. I read a few things here and there, but Josh and I are mostly just figuring this out as we go along. We'll see how it works, and I'll try to share what we've learned along the way.

Getting started:

In Michigan, its still too early to plant outside. But, we've gotten a head start on things, and here is what we have done so far:

1. We decided to create a raised bed garden. This will allow us to control/improve the soil used, and put it anywhere we want. (Post to come later on how to build a raised bed, when we actually figure out how to build it.)

2. Decide where its going - you need to pick a place with quite a bit of sunlight. We found a spot in our front yard that is mostly protected by some bushes, but still gets a lot of sun. We put down a tarp (the tarp is only 3'x6') to try and kill the grass underneath. The grass isn't dying yet, maybe this is a good thing.

3. Decide how big your garden is going to be. We are going to build a 4'x8' bed. We came up with that just because. You could make a detailed list of what you want to grow and determine what size you need. Or you can wing it like us. I'll let you know how that works out.

4. Get your plants. You can buy seed packets, or starter plants. We did some of each. We did absolutely no research ahead of time - we stood in Home Depot going: "What about this?" "Oh, this looks good!" "We definitely need bell peppers." "Hmm... Who knew there were so many kinds of green beans. Whats the difference. I don't know, just pick one." "Oh, lets try watermelon!" So yeah... we probably have more than we have space for, but we'll figure that out later.

Seed packets: Summer squash (Golden zucchini and Fordhook zucchini), Watermelon, Green Onion, Green beans (Fordhook and Tenderpick), Cucumber, Spinach, Lettuce, Sweet Basil, Parsley, Oregano, Cilantro, and Dill.
Starter plants (no - we aren't growing weed in our basement....): Red bell pepper (x2), Yellow bell pepper, Green bell pepper, Orange bell pepper, Roma tomato (x2), Grape tomato (x2), Beefmaster tomato (x2), and Jalapeno pepper. (I see some salsa in our future....)
5. Start your seeds. We live in Michigan. It is still too cold to start our garden outdoors, so right now we are babying our plants in the basement. We also needed to start the seeds growing so that once we are ready to plant outdoors, we can transplant sprouts and hope for an earlier and longer harvest.

We bought these Jiffy-Pots to plant the seeds in. There are 26 peat-moss pots to a pack.
I used some of the compost and some leftover potting soil to get the seeds started.
I put the mini pots in disposable containers and labeled the edge with a Sharpie so I know what each one is. We planted the seeds on April 25, and we already have quite a few sprouts. The plants live in the basement right now since its still chilly at night. When its nice and sunny out, Josh brings all of the containers outside for the day to get some direct sunlight. (This is their home in the basement. Please ignore our box pile.)
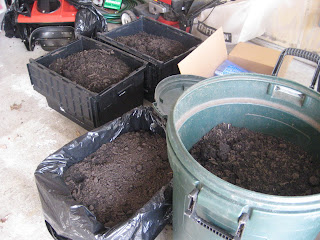
6. Get dirt. We don't have all the dirt we need yet, but Bay City was giving away free compost for Earth Day, so we headed down and loaded up approximately 15-18 cubic feet of compost. We'll talk dirt when I figure out what else we need. (One container is missing from this picture since I had it outside filling the small pots.)

So that's where we are today. The next step is to get our raised bed built and filled. Oh, and to keep these seedlings alive and thriving!

Cost so far:
Compost: Free; +$5 donation to Little Leaguers for helping us shovel and load it
Plants (12): $19.38 (They were on sale B1G1 free)
Seed packets (14): $7.89 (These were all 50% off)
Jiffy pots (1 pack): $1.99

Total to date: $34.26

Friday, May 8, 2009

Feta and Balsamic topped Grilled Chicken

I tried thinking of a name to make this sound fancy, but really it was just a simple dinner I threw together. And it was yummy! Perfect for the nice weather we have had around here lately.
Feta and Balsamic Grilled Chicken
serves 2

2 chicken breast halves, cleaned
Italian seasoning
salt and pepper
~2 Tbsp balsamic vinegar
1/4 c. feta crumbles (I used the tomato and basil variety)
2 Tbsp basil, chopped
tomato slices - optional

DIRECTIONS:
1. Coat chicken breasts in Italian seasoning, salt and pepper. Grill until cooked through.
2. Top each chicken breast with ~1 (heavy) Tbsp. balsamic vinegar, 2 Tbsp. feta, and 1 Tbsp. basil. Some Roma tomato slices would also be a great addition.
3. Place the chicken under the broiler for about a minute to soften the cheese and warm the balsamic/tomatoes. Or zap it in the microwave for 30 seconds if that is easier for you.
4. Serve with brown rice and a veggie (oops.). Enjoy!

REVIEW:
Very light and refreshing. Tomatoes would be a good addition. I might try marinating the chicken breasts in some balsamic next time to see how that works.

3-Packet Pot Roast

I had a chuck roast in the fridge to use up, and Josh requested a crock pot roast. I didn't have any of the regular veggies I toss in the crockpot (celery, carrots, onions, potatoes) so I was on the search for something different. I found this recipe from the crockpot lady, and served the roast with some corn and herb toast.3-Packet Pot Roast in the Crockpot
serves 4-6, depending on roast size

~3 lb chuck roast
1 packet ranch salad dressing and seasoning mix
1 packet Italian salad dressing mix
1/2 packet Grill Mates peppercorn and garlic seasoning (the original recipe calls for a whole packet, but the pepper taste is just too strong!)
1 to 2 cups of water
(you could toss in some of the veggies I mentioned earlier if you wanted)

DIRECTIONS:
1. Place the roast in the crockpot.
2. Mix all the seasonings together in a bowl and pour on top of the meat. Flip the meat over a few times to coat it with the seasoning.
3. Add 1-2 cups of water, until the meat is almost covered.
4. Turn on low and cook for 8 hours, or on high for 4-5.
5. Dinner is served! Josh wanted gravy with ours, so I had him whisk in some flour to the juices left in the crock pot after removing the meat. He probably whisked in ~1/4 cup of flour, turned the crock on high, and the gravy just thickened right up.REVIEW:
You really only need 1/2 of a packet of the peppercorn seasoning. We used a whole packet, and the pepper taste was very strong, especially in the gravy. Other than that, this was a very tasty meal! The roast was so tender, just how we like it. It was also easy, Josh actually put it together while I was at work. All day long he commented how good it smelled!

Wednesday, May 6, 2009

Egg Muffins

I'd be lying if I said these were my favorite. There are plenty of other things I'd rather have for breakfast, but when I am watching my carbs and looking for a high-protein meal to start the day, these fit the bill. I start work at 7 am, so I don't have a lot of time in the morning to make up eggs or an omelet. These are great because I can pop a couple of them in the microwave after I get to work and they make a quick, healthy meal.
The amounts aren't exact. Really, you can add and anything to make them to your liking (ham, asparagus, broccoli, mushrooms.... the list goes on).

Egg Muffins
I have seen recipes for these all over, but I can't pick just one than this is adapted from.
makes 11-12 egg muffins

4 whole eggs
2 egg whites
splash skim milk
1/2 to 1 cup of chopped veggies (this time I used red and green pepper and green onions)
1/2 c. reduced fat cheddar cheese (plus maybe a little extra to be safe)
a dash or 3 or more hot sauce (optional)
salt and pepper to taste
other seasonings you like (this time I added 1/2 tsp rosemary)

DIRECTIONS:
1. Preheat oven to 350 deg F. Spray muffin pan with non-stick cooking spray.
2. Wisk eggs, egg whites, and spices together. Stir in cheese and veggies.
3. Fill muffin cups ~2/3 full, trying to make the amount of egg and filling (veggies/cheese) even in each one.
4. Bake for 15-20 min, or until eggs are set. Cool. I like to store them 2 to a sandwich bag in the fridge and then grab a bag when I head out for work. You can freeze them if you don't plan to eat them in the next couple days.
REVIEW:
This is definitely NOT my favorite way to eat eggs. But, it works, and I'm tired of the hard-boiled variety. Its a great recipe to modify to find the flavor/veggie combos that you like the most.

Friday, May 1, 2009

Spicy Broccoli

Oh man, I'm so behind on updates. Hopefully I can catch up in the next few days.

Here is a quick and easy side. Most of the time when I eat broccoli, I steam it and toss on a little butter, salt, and pepper. How boring. Here I basically just pan fried it in some red pepper flakes to spice things up a bit!
Easy Spicy Broccoli

1 bunch broccoli, stems trimmed down
1 Tbsp olive oil
1/2 tsp. red pepper flakes (adjust to level of spice desired)

DIRECTIONS:
1. Start by steaming the broccoli a bit. Stop it shy of tender, you will add more heat in the pan. (I use the Ziploc microwave seaming bags - they are so easy, and you add nothing to them but the veggies).
2. While steaming, heat the oil in a skillet over medium heat. Add the red pepper flakes and allow the flavor to infuse in the oil.
3. Toss the broccoli in the oil and pan fry for 2-3 minutes, until tender.

REVIEW:
Wow! These were spicy! I added closer to 1 tsp. crushed red pepper, and it was too much for us, and we like things hot. I already reduced the amount in the recipe above. This really isn't that creative of a recipe, but we like to change things up in a while, and I encourage you to try the same!