Tuesday, April 28, 2009

A Taste of Chicago

Yea, I won! I enter Joelen's Foodie Freebie Friday contests on an almost-weekly basis, and a couple weeks ago, I had the pleasure of winning a couple Chicago Style Pizzas, shipped directly to my doorstep! I picked two flavors from the Lou Malnati's website, and I had them a few days later. Thanks Joelen!!Each pizza came in its own foil pan to bake it in. Before baking, they suggest you defrost in the fridge for about 2 hours, then bake for 45 min. You can also bake directly from the freezer. This was a nice, easy dinner on Friday!
Can you see the layers on this pizza? A layer of cheese, a whole LAYER of sausage, and then topped with a very tasty sauce!REVIEW:
I was even impressed with the packaging! The pizzas arrived wrapped in a cooler with dry ice - they stayed perfectly frozen during shipping. So far we only tried the sausage pizza - but oh, my was it good! The sausage is blended especially for Lou Malnati's and its really tasty! I especially liked the sauce - a little on the chunky side, just how I like it. It was a nice deep dish crust without being too greasy or doughy. I also picked the Spinach Pizza (spinach, provolone, onions, garlic and basil), and I can't wait to try it!

Sunday, April 26, 2009

Wilton Course I Final Cake: Strawberry Layer Cake

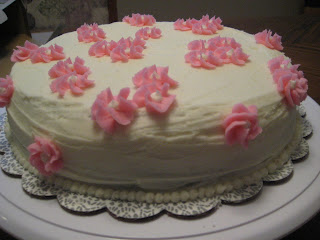
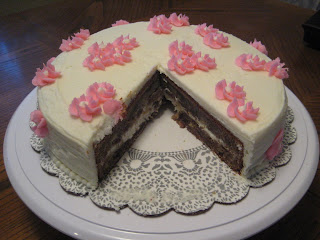
My final class for the Wilton Course I was this past week. I present to you, my final cake:

It could be worse. My roses are a little limp b/c my icing wasn't quite stiff enough. And there are crumbs all over the cake (which at one point brought tears to my eyes...). And if I showed you a different picture, you would see it is leaning at a similar angle to a certain tower in Pisa. So, I still have some practice to do. BUT regardless of all of that, it tasted WONDERFUL! I got mucho brownie points from the guys at work for bringing this in. And the crumbs didn't seem to bother them one bit.

As for the Wilton class, I highly recommend it. This class went over the basics, but with just a little instruction on technique and some practice under my belt I am a completely different cake decorator. Ha - its easy to go up when you are starting at ground level. Seriously though, its worth it. At some point I may take the second class (flowers and borders), but our waistlines need a break over here.Strawberry Layer Cake
adapted from Good Things Catered

Cake:
2 1/4 c. cake flour* (see substitution below)
3/4 c. strawberry puree, room temperature** (I made my own, see below)
1/4 c. milk , at room temperature
6 large egg whites, room temperature
1 Tbsp vanilla extract
1 3/4 c. sugar
4 tsp baking powder
1 tsp salt
12 Tbsp unsalted butter (1 1/2 sticks), softened (not melted)

* Cake flour is recommend. As a substitute: 1 c. cake flour = 1 c. all-purpose flour minus 2 Tbsp, plus 2 Tbsp cornstarch. So, 2 c. cake flour = 1 3/4 c. ap flour + 1/4 c. cornstarch.
** For the strawberry puree, I blended ~ 24 oz fresh strawberries with 1/4 c. sugar. This made ~2 cups? I used the rest for the filling (below), and still had some leftover. I would use half the amounts if you don't plan to fill the cake.

Filling:
Bring 1 cup of the strawberry puree to a boil in a small saucepan. Wisk in 1 1/2 Tbsp cornstarch and let bubble for about a minute. Remove from heat, sauce will continue to thicken as it cools.

Icing:
1 recipe Wilton buttercream, or a buttercream recipe of your choice

DIRECTIONS:
1. Preheat oven to 350 degrees and prepare two 8 in pans: line outside with heavy duty foil and spray inside with baking spray with flour. (I used 9 in pans.)
2. In small bowl, combine puree, milk, egg, vanilla and mix with fork until well blended.
In bowl of stand mixer, add sifted flour, sugar, baking powder and salt and mix to combine.
3. Continue beating at slow speed and add butter. Mix until combined and resembling moist crumbs.
4. Add liquids and beat at medium speed for about 1 minute or until full and evenly combined.
5. Stop mixer to scrape down the sides of the bowl and hand beat for 30 more seconds.
6. Divide the batter evenly among the pans and smooth tops. Bake for about 25 minutes or until a toothpick inserted in the center comes out clean (time will vary).
7. Let cakes rest in pan for about 10 minutes and turn out onto wire racks. Let cakes cool completely (about 2 hours). (Now, make buttercream while they cool.)
8. When cakes are cooled, level tops. Pipe medium consistency icing 1/4 inch from the edge of one cake. Make this a thick/high line to accommodate the height of your filling.
9. Fill border with thin layer of buttercream. Top with a layer of the strawberry filling. Make this a good sized layer, but don't go any higher than the border you piped or else your top cake will slide around.
10. Top with second cake, top side down. The bottom is the smoothest part and is best to frost this as the top of your cake.
11. Dollop about 3/4 of the buttercream mixture onto the top of the cake and using a spatula, spread icing over the top and down the sides. Use additional frosting to ice the sides and fix any mistakes.
12. Wait until frosting forms a crust to decorate (about 30 minutes). You may need to make an additional recipe of buttercream to decorate with, depending on the design you have in mind.REVIEW:
This cake was SOOOO good. No one seemed to mind it was lopsided except for me. My top layer slid around on the strawberry filling a bit, but I think if I make the buttercream border thicker between layers I won't have that problem next time. Katie (where I got the recipe from) used chocolate buttercream, and I can only imagine that would be great as well.

Friday, April 24, 2009

BBQ Chicken Pizza and Easy Pizza Crust

I was craving a BBQ chicken pizza, so I thought we could make one. I was sure I had a tube of pizza crust in the fridge. But I didn't. I found a quick pizza crust recipe online, and another one to modify the BBQ/pizza sauce a little. This turned out pretty good, but I think it totally depends on what kind of BBQ sauce you use as the base.
BBQ Chicken Pizza
makes ~14" pizza

Crust:
1 (.25 ounce) package active dry yeast
1 teaspoon white sugar
1 cup warm water (110 degrees F/45 degrees C)
2 1/2 cups bread flour
2 tablespoons olive oil
1 teaspoon salt (I also added 1 Tbsp Italian seasoning and a little garlic powder)

DIRECTIONS:
1. Preheat oven to 450 degrees F. In a medium bowl, dissolve yeast and sugar in warm water. Let stand until creamy, about 10 minutes.
2. Stir in flour, salt and oil. Beat until smooth. Let rest for 5 minutes.

3. Turn dough out onto a lightly floured surface and pat or roll into a round. Transfer crust to a lightly greased pizza pan or baker's peel dusted with cornmeal. Prebake for about 10 minutes before topping.

Pizza:

2 boneless chicken breast halves, cooked and cubed (~1 lb chicken, make small cubes!)
1 cup hickory flavored barbeque sauce (I used Thick and Tangy, but I don't remember the brand)
1 tablespoon honey
1 teaspoon molasses (I omitted as I didn't have any)
1/3 cup brown sugar
1/2 bunch fresh cilantro, chopped (Didn't have any of this either!)
1 (12 inch) pre-baked pizza crust (see above)
1 cup mozzarella cheese
1 cup thinly sliced red onion (I also added some green pepper rings)

DIRECTIONS:

1. In a saucepan over medium high heat, combine chicken, barbeque sauce, honey, molasses, brown sugar and cilantro. Bring to a boil.

2. Spread chicken mixture evenly over pizza crust, and top with cheese and onions (and peppers).
Now bake pizza for additional 10-15 minutes (at 425-450 deg F), or until golden brown. Let baked pizza cool for 5 minutes before serving. REVIEW:
This was good, but it was hard to eat too much (maybe thats actually a good thing). The BBQ had a pretty strong taste. Next time I might look for a honey BBQ sauce, and reduce the sugars in the recipe. Also, you probably don't need quite so much sauce. The crust recipe worked for us b/c it was nice and quick, but it is a pretty thin crust since you don't let it rise. It will work in a pinch, but its not my favorite.

Easy Cheesy Chicken Enchiladas

Have I mentioned that we LOVE Mexican? This is our go-to enchilada recipe (well, um, actually its the only one I've ever made. But it works! Maybe I'll branch out next time?) courtesy of Josh's friend Estee. And its cheesy too!
Cheesy Chicken Enchiladas
Makes a lot - last time we filled 8 (8"?) tortillas, but we filled them really full. You could easily make 12-16 tortillas by not filling them so that they barely close. Or you could use the smaller tortilla size and make probably 16-20.

6 cups cooked, shredded chicken (I used about 1.3 lbs, boiled the chicken, then shredded it.)
1 cup chopped onion (I used about 1.5 cups - 1 big onion)
2 Tbsp. vegetable oil (I used olive oil)
1 Tbsp. chili powder (scale back if you don't like things too hot, I actually use ~2 Tbsp.)
2 tsp. garlic powder
1 package (8 oz) cream cheese (I use 1/3 less fat)
1 cup salsa (I used about 1.3 cups)
8 oz. shredded cheese, cheddar or Mexican blend (ha! I used a bag and a half, so more like 12 oz.)
1/4 c. chopped black olives (I omitted since we don't like olives. And I didn't feel like I was missing out at all.)
12-16 flour tortillas (I used 8 whole wheat tortillas and stuffed them so they barely closed. Flour tortillas are definitely better though, but the wheat don't taste too bad if you are watching your carbs.)
2 cans (14 oz each) enchilada sauce (my cans were only 10 oz each and I used 2)
sour cream, salsa, and chopped green onions for serving

DIRECTIONS:
1. Heat oil in a skillet over medium heat. Add onions and saute for ~5 min.
2. Add chili powder and garlic powder to the onions and stir.
3. Turn the heat to low. Add the cream cheese in globs over low heat, and stir until melty.
4. Stir in the cooked, shredded chicken.
5. Stir in the salsa. If the mixture looks a little dry, add some more salsa. Stir and let cook for about 3-5 min. Now is a great time to preheat the oven to 350 deg F, and spray some non stick spray in the bottom of a 9x13" baking dish (this might not be big enough. You might need 2 baking dishes if you don't overfill your tortillas).
6. Now stir in 1.5 cups of the shredded cheese (or a little more) and the olives if using. Turn off the heat.
7. Pour one can of enchilada sauce into the bottom of the baking dish.
8. Spoon some of the mixture into each tortilla, and place seam side down in the baking dish. Repeat until the chicken mixture is all used up. Smoosh them all together so they all fit.
9. Pour the second can of enchilada sauce over the top of the tortillas. Top with remaining cheese. Open a second bag of cheese if necessary.
10. Bake at 350 deg F for 15-20 min. Serve with salsa and sour cream. Also nice to top with a few green onions if you have any (which I did not). Enjoy!
REVIEW:
Yummy! This makes A LOT of food. It lasts ~3 meals for us, and we don't mind eating it over and over at all! Its a regular in the rotation. It sounds like a lot of steps, but the recipe is pretty quick to put together once you have the chicken cooked and shredded. I'll be submitting this recipe to Joelen's Foodie Films event, featuring Mexican inspired dishes. Not very original, but it fits the bill!

Sunday, April 19, 2009

Dinner Spanakopitas

I came across this recipe while cruising Annie's blog. I has some left over phyllo dough from this wrapped asparagus appetizer, and spanakopitas looked like a good use-up since I love the spinach-feta combo.Dinner Spanakopitas
Annie's adaptation of an Ina Garten recipe
makes 8 large spanakopitas

2 Tbsp. olive oil
1/2 c. chopped yellow onion (I used ~3/4 c.)
2 green onions, white and green parts, chopped
1 (10-oz.) package frozen chopped spinach, thawed and drained
2 eggs, lightly beaten
2 Tbsp. freshly grated Parmesan cheese (I use the canned stuff)
1 1/2 Tbsp. Plain dry bread crumbs
1/4 tsp. grated nutmeg
1 tsp. kosher salt
1/2 tsp. ground black pepper
1 c. small-crumbled feta cheese (I used tomato-basil feta)
2 Tbsp. toasted pine nuts, chopped (I omitted)
16 sheets frozen phyllo dough, defrosted
6 Tbsp. unsalted butter, melted (I used the butter flavored Pam spray - shortcuts whenever I can!)

DIRECTIONS:
1. Preheat the oven to 375 degrees F.
2. Heat the olive oil in a medium sauté pan, add the onion, and cook for 5 minutes over medium-low heat. Add the green onions and cook for another 2 minutes until they are wilted but still green.
3. Meanwhile, add the thawed and drained spinach to a large mixing bowl. When the onions are done, add them to the bowl. Mix in the eggs, Parmesan cheese, bread crumbs, nutmeg, salt and pepper. Gently fold in the feta and the pine nuts.

4. Place one sheet of phyllo dough flat on a work surface. Brush the dough lightly with butter. Working quickly, place another sheet of phyllo on top of the first, and brush it lightly with butter. Continue this process until you have a stack of 4 sheets of phyllo. Cut the stack of phyllo in half lengthwise (I found a pizza cutter useful for this step). Place ~1/3 cup of the spinach filling on the shorter end and roll the phyllo up diagonally as if folding a flag. Then fold the triangle of phyllo over straight and then diagonally again. Continue folding the first diagonally and then straight until you reach the end of the sheet. The filling should be totally enclosed. Continue assembling phyllo layers and folding the filling until all of the filling is used. Place on a sheet pan, seam sides down.
5. Brush the tops with melted butter, sprinkle with flaked salt (I used kosher) and bake for 30-35 minutes, until the phyllo is browned and crisp. Serve hot.

REVIEW:
These were good. This recipe made 8 strudels for me, which left us with a lot of leftovers. Next time I will cut the recipe in half, since these didn't reheat well - the pastry got soggy. The leftovers were definitely still edible, but not as yummy as when they came out of the oven. You could also use this same filling and wrap smaller portions in smaller strips of phyllo for a great appetizer!

Easy Italian Green Beans

I feel kind of guilty calling this a recipe, since it is sooo easy! My sister-in-law made this as a side for dinner once, and I loved it. She told me the recipe, and I may have changed the amounts a little over time, but this is what works for us.Easy Italian Green Beans

1 lb. fresh green beans, ends trimmed
1/4 c. butter (I used 2 Tbsp. butter and 2 Tbsp. olive oil)
1/2 c. Italian dressing (I use Kraft Free Zesty Italian)

DIRECTIONS:
1. Melt butter in a skillet over medium heat. Add olive oil. Add green beans and stir to coat.2. Add Italian dressing (I eyeball it, and I probably use a little more than 1/2 c.) and stir to coat.3. Cover and cook over medium heat for about 10-15 minutes stirring occasionally. Don't let the green beans get too soft. I like to take off the cover for the last ~3 minutes or so to let some of the dressing carmelize a bit.
4. Serve and enjoy!

REVIEW:
This time we had some leftover meat from Easter (ham and sausage), and I just needed to make a vegetable for dinner. This is a go-to side for me when green beans look good at the grocery store (its also pretty cheap to make). You could make it lighter by reducing the fat (butter/oil) in the recipe. Originally I think it called for a 1/2 c. butter, so I already cut it in half and it still tastes great. Top with some slivered almonds for a prettier presentation. Thanks Sarah!

Wilton Buttercream Icing

There are a few versions of the Wilton recipe out there, but this is the one recommended in my class. I will probably stick with a pretty traditional Wilton recipe for "decorating," but there are plenty of other icing recipes that you could use as the base frosting on your cake. The Wilton recipes are meant to be stiff enough to hold the shape of your piping and decorations without "melting," which is why they don't use straight butter.

Class Buttercream Icing
stiff consistency, yield ~3 cups
source: Wilton Class I Student Guide

1 c. solid white vegetable shortening (For the batch I make as the base frosting on my cake, I use 1/2 c. vegetable shortening and 1/2 c. butter)
1 tsp. flavoring (clear vanilla abstract, or almond or butter abstract will work too)
2 Tbsp. milk or water
1 lb. confectioners' sugar (approx 4 c., sifted is best)
1 Tbsp. meringue powder
a pinch of salt

DIRECTIONS:
1. Cream shortening, flavor, and water.
2. Add dry ingredients and mix on medium speed until all incorporated. Blend an additional minute or so, until creamy.
*To alter to medium consistency, add 1 tsp. water to each cup of stiff consistency icing. To alter to thin consistency, add 2 tsp. water to each cup of stiff consistency icing.
** Chocolate variation: Add 3/4 c. cocoa or three 1 oz. unsweetened choc squares (melted), and an additional 1 to 2 Tbsp. water to recipe. Mix until well blended.

Wilton Cake Decorating Class I; Weeks 1, 2, 3

My first "decorated" cake ever:Not too shabby! It still needs some work, and these flowers were really easy, but I'm pretty pleased. The cake itself didn't turn out quite as well - somehow it was really dense and kind of dry.The recipe I used looked promising, so I'll try it again sometime and post it once I figure out what I did wrong. I used the Wilton frosting recipe, which I will post next, since this was for my cake class.

For those not familiar, the Wilton Method is a way of cake decorating that is popularly taught in many craft stores across the nation. There are a few different classes available, but the first class covers the basics, and a few weeks ago, I enrolled in Class I. The class is supposed to be 2 hours a week for 4 weeks, but since my class is so small (uh, theres 2 of us), we will finish in three classes.

The class itself only cost me $17.50 to take (thanks to a special from the store), but I did spend about $40 in materials for the class (yea 40% off coupons!). I didn't buy the kit recommended for the class, just the pieces my teacher said I would need (since I had some of the stuff on hand already).

In the first week, the teacher went over the basics, and then we practiced everything from the second lesson on the cake she brought instead of baking and bringing our own (you don't actually need anything for the first class). For lessons 3 and 4, I have to bring my own cake and icing (normally you would bring a cake and icing for classes 2, 3, and 4). Next week, which is the final class, we will finish learning the Wilton rose and I will be perfectly prepared to decorate cakes at any chain grocery store bakery! (You know, just in case I get bored with engineering or anything...)

Friday, April 10, 2009

The Chewy (choc chip cookies)

This recipe is all the rage on food blogs these days, so I figured I would make it a part of mine as well. Alton Brown of the Food Network did a comparison study on chocolate chip cookie recipes: The Chewy, The Puffy, and The Thin. I haven't tried the other two, but The Chewy is a winner in our house.
Tall glass of milk, required.The Chewy, a chocolate chip cookie recipe
makes ~30 large cookies

2 sticks unsalted butter, melted
2 1/4 c. bread flour
1 tsp. kosher salt
1 tsp. baking soda
1/4 c. sugar
1 1/4 c. brown sugar
1 egg
1 egg yolk
2 Tbsp. milk (I used skim)
1 1/2 tsp. vanilla extract
2 c. semisweet chocolate chips (I used 1 1/2 c. semisweet, and 1/2 c. milk choc chips)

DIRECTIONS:

1. Heat oven to 375 degrees F. (Read further! I did this after chilling the dough for a while.)
2. Melt the butter in a heavy-bottom medium saucepan over low heat. Sift together the flour, salt, and baking soda and set aside.
3. Pour the melted butter in the mixer's work bowl. Add the sugar and brown sugar. Cream the butter and sugars on medium speed. Add the egg, yolk, 2 tablespoons milk and vanilla extract and mix until well combined. Slowly incorporate the flour mixture until thoroughly combined. Stir in the chocolate chips.
4. Chill the dough (I chilled for about an hour), then scoop onto parchment-lined baking sheets, 6 cookies per sheet, using an ice cream scoop (yes, I mean ice cream scoop, ideally a #20 according to Alton). Bake for 14 minutes or until golden brown (mine needed 12 min), checking the cookies after 5 minutes. Rotate the baking sheet for even browning. Cool completely and store in an airtight container.,

REVIEW:
Yum! A great chocolate chip cookie recipe, no complaints from this camp! Please note: There are 3 things (in my opinion) that are special about this recipe. 1. The butter is melted, not softened. 2. It calls for bread flour. All-purpose flour is not the same thing. Use AP, and the chewiness is not guaranteed. 3. You must chill the dough before baking. This helps to keep the cookies from spreading. If you are impatient, you might end up with a Thin instead.

Pasta with Garlic, Olive Oil and Red Pepper Flakes

I needed one more meat-free dish for dinner tonight, and I was getting a little tired of tilpia. I had some pasta to use up, and I found this easy recipe from Giada on the Food Network site. This recipe would be a great base to add fresh peppers, shrimp or chicken too. I didn't have any peppers or shrimp on hand for me, but Josh grilled some chicken to add to his pasta.Spaghetti with Garlic, Olive Oil, and Red Pepper Flakes
serves ~6(?), I cut the following recipe in half for the two of us (and we ate it all....)

1 lb. spaghetti (I used whole wheat thin linguine)
1/2 c. extra virgin olive oil
3 garlic cloves, peeled and cracked (I used all 3, smack with the side of a large knife to crack them)
1 Tbsp. red pepper flakes, more if desired (I used 1 Tbsp.)
1/4 c. chopped flat leaf parsley
1 Tbsp. chopped fresh Basil leaves
1 Tbsp. chopped fresh Mint leaves (I omitted)
I topped with parmesan cheese - the kind from the can :)

DIRECTIONS:
1. In a large pot, bring to a boil 6 quarts of salted water. Add pasta and cook until al dente, about 6 to 8 minutes. Drain pasta in a colander, reserving 2 tablespoons of the pasta water. The reserved pasta water will help create the sauce. Do not rinse pasta with water -- you want to retain the pasta's natural starches so that the sauce will stick.
2. In a large saute pan, heat olive oil over medium heat. Add the garlic and saute until light brown and fragrant. It's important not too burn the garlic or else it will become bitter. Remove and discard the browned garlic. Add the red pepper flakes and saute for 1 minute.
3. Carefully add the reserved pasta water and stir to combine. (Adding the water will make the oil splatter, so stand back a bit!) Place the spaghetti into the pan and mix well for 1 minute.
4. Remove pan from heat and toss with fresh herbs. Top with cheese (and grilled chicken), if using. Enjoy!REVIEW:
This was a light sauce for our pasta, and it was fast and easy to make. I would add chicken/shrimp/or peppers, since the pasta itself is a nice base, but doesn't make for a very complete meal.

Goat Cheese Quesadillas with Carmelized Onions and Fresh Basil

The title pretty much says it all. I wanted to use up some of the random left over ingredients in my fridge, and this was a quick and easy lunch! I got the idea from Brianna at Oishii.Goat Cheese Quesadillas with Carmelized Onions and Fresh Basil
makes one quesadilla

2 tortilla shells (I used 6")
Goat cheese (I used about 2 Tbsp spreadable)
1 small onion, sliced
1 Tbsp olive oil
Fresh Basil, chopped

DIRECTIONS:
1. Heat oil in a small pan over medium heat. Toss in onion slices and cook until light brown, stirring often.
2. Spread goat cheese on one side of each tortilla.
3. Remove onion slides from the skillet and place on one of the tortillas. Sprinkle with basil. Place other tortilla, goat cheese side down, on top, making a sandwich.
4. Place the tortillas back into the pan for about 2 minutes on each side to toast the tortillas. Slice and enjoy!

REVIEW:
This was a great lunchtime snack for me, but would also make a nice appetizer. Tomatoes or mushrooms would also be nice additions.

Monday, April 6, 2009

Homemade Honey Wheat Bagels

Yes, you read that right. I made my own bagels. I've seen these pop up on a few blogs recently, and even though we rarely eat bagels, they looked easy enough and I wanted to try making them. Really though... they were totally simple! Even I could do it :) The process takes a little time because of the rising, but still easy steps. The referenced recipes make plain and everything bagels, but I changed things up a bit to make honey whole wheat bagels. They turned out great!Honey Whole Wheat Bagels
makes 12 medium or 8 large (sandwich size) bagels
adapted from Pennies on a Platter and Baking Bites

1 Tbsp active dry yeast
3 Tbsp honey
1 3/4 c. water, warm (100-110 deg F, temperature is important!)
2 c. whole wheat flour
2 c. bread flour (not all-purpose)
1 Tbsp salt
1 egg, for egg wash
cornmeal

Optional Seasonings:
Oats
Brown Sugar

DIRECTIONS:
1. In a large bowl (or the bowl of a stand mixer) combine yeast, honey and water. Let stand for 5 minutes, then stir in flour and salt. Mix dough thoroughly until it comes together in a large ball, pulling away from the sides of the bowl. Add an additional tablespoon of ww flour or water, if needed. (I need about an extra 3 Tbsp of flour.)

2. If kneading by hand, turn dough out onto a lightly floured surface and knead until very smooth and elastic, about 10 minutes. If using a stand mixer, knead dough with the dough hook until elastic, about 8 minutes on a low speed. Place dough in a lightly greased bowl, cover with plastic wrap and let rise for 1 hour, or until doubled in size.

3. When dough has risen, turn the dough out onto a very lightly floured surface and divide into 8 equal pieces (first quarters, then halves). Shape each piece into a tight ball, pinching the corners together at the bottom of the dough. When all the balls are shaped, let the dough rest for 30 minutes covered with a clean dish towel.

4. Once dough balls have rested, the bagel shape can be formed. Using your fingers, poke a hole through the center of each dough ball. Stretch out the dough into a ring with your fingers and be sure to make the hole a little larger than you want the finished bagel to have, as it will shrink slightly while the bagel is expanding during the baking process. Let bagels rest for about 10 minutes.

5. Meanwhile, bring a large pot of water to a gentle boil and preheat the oven to 400 deg F. (I used a deep dish skillet because it’s wider.) Line a baking sheet with paper towels and another baking sheet with parchment paper sprinkled with cornmeal.

6. Working four at a time, drop the bagels carefully into the boiling water. Boil for 2 minutes on each side. (They should puff up quit a bit.) Using a slotted spoon or strainer, transfer bagels to the paper towels to drain for a moment, then place on the parchment-lined baking sheet. Repeat process with remaining bagels.

Brush boiled bagels with lightly beaten egg (a pastry brush is a good tool for this) and sprinkle with oats and just a little bit of brown sugar. Bake for 24 minutes, or until golden brown. Cool completely on a wire rack (bagel will soften slightly as it cools). Store in a Ziploc bag. Enjoy!

REVIEW:
These were surprisingly easy, and they tasted like some bagels I have bought from the bakery. I will definitely make these again, as I think it will be fun to play with some different seasonings.

Sunday, April 5, 2009

Hershey's Perfectly Chocolate Frosting

I found this courtesy of Annie when I was making Cookies and Cream cake. It really is the perfect chocolate frosting. Irresistible.Perfectly Chocolate Frosting
original recipe from Hershey's

½ c. unsalted butter (1 stick)

2/3 c. cocoa powder

3 c. confectioners’ sugar

1/3 c. milk (I used skim)

1 tsp. vanilla extract


DIRECTIONS:

1. Melt the butter in a medium bowl. Stir in the cocoa. Alternately add confectioners’ sugar and milk, beating to spreading consistency. Add small amount additional milk, if needed. Stir in vanilla.

2. Stop eating it out of the bowl!


REVIEW:

Ohmygoshthisissogood. Perfect chocolate frosting. Don't tell Hershey's that I used Nestle cocoa powder. But seriously - this is great for covering cakes, spreadable - a great consistency. I recommend all around.


Cookies and Cream Cake

I was looking around for a cake for my birthday dinner, and settled on this one. It looked good, and the chocolate frosting gets rave reviews. Annie had a few others that I was deciding between... I will definitely be visiting her site for ideas again.Cookies and Cream Cake
Makes an 9" cake, original cake source: Hershey's

For the cake:

2 c. sugar

1 ¾ c. all-purpose flour

¾ c. cocoa powder

1 ½ tsp. baking powder

1 ½ tsp. baking soda

1 tsp. salt

2 eggs

1 c. milk (I used skim)

½ c. vegetable oil (I used 1/2 c. applesauce)

2 tsp. vanilla extract

1 c. boiling water


For the filling:

1 ¼ c. heavy cream

1/8 c. confectioners’ sugar

¼ tsp. pure vanilla extract

10 chocolate sandwich cookies, chopped

(NOTE: I didn't go to this much trouble. I used a 12 oz. container Free Cool Whip, and about 1/2 cup of crushed chocolate sandwich cookies leftover from my Oreo pie. Mix the two together. Delish. And easy. And trust me, the cake is rich enough, no extra sugar required.)


For the frosting:

1 recipe Hershey's Perfectly Chocolate Frosting


DIRECTIONS:


Cake:

1. Preheat the oven to 350° F. Grease and flour two 9-inch round baking pans.

2. Stir together the sugar, flour, cocoa, baking powder, baking soda and salt in a large bowl. Add eggs, milk, oil and vanilla; beat on medium speed for 2 minutes. Stir in boiling water (batter will be thin). Pour batter into prepared pans.

3. Bake 30-35 minutes or until a toothpick inserted in the center comes out clean. Cool 10 minutes; remove from pans to wire racks. Cool completely.


Filling:

1. In the bowl of an electric mixer fitted with the whisk attachment, combine the heavy cream, confectioners’ sugar and vanilla. Beat on low speed until all sugar is incorporated; increase speed to high and whisk until stiff peaks form. Gently fold in chopped cookie pieces with a rubber spatula. (Or just mix cookie pieces with a container of cool whip. Sometimes I just take the easy way out.)


* Now make the frosting recipe.


To assemble to the cake:

(NOTE: For some reason, I thought this needed to be a 4 layer cake instead of a 2 layer cake, so I cut each layer in half first. I still assembled as stated below, but with two extra layers as you can see in the pictures.)

1. Place one cake layer on a cardboard cake circle. (I didn't have one, hence the cookie sheet covered with foil.) Pipe a ring of the chocolate frosting around the outside edge of the cake. (I just cut the corner off a Ziploc bag.) Fill the area inside the ring of frosting with a thick layer of the cookies and cream mixture. Place the second cake layer on top. (Repeat for layers 3 and 4 if necessary.)

2. Frost the sides of the cake layers with chocolate frosting. Pipe a decorative border of the chocolate frosting on top of the cake. Fill the area inside this border with a thick layer of the cookies and cream mixture. Garnish with extra chocolate sandwich cookies and whipped cream if desired. (I did the top a little different. You can do whatever you want, it will all taste the same.)

REVIEW:
SO. GOOD. The chocolate frosting is heaven, and the cookies and cream helps lighten up the cake. I should have put some more cookies and cream between the layers - really heap it in there. I don't know if I loved the cake recipe. It was chocolatey and moist, but it was pretty dense. It worked well for this, but it isn't going to be my go-to chocolate cake recipe. None-the-less, all of this together worked. Be sure to serve with some ice cream or milk, you need it to wash this cake down!

Kay's Braised Chicken

I came across this recipe on the Pioneer Woman Cooks site, and the colors totally caught my attention. I knew I had to make it! I invited some family up for dinner, and this was a hit! It was very fragrant (the cinnamon does amazing things for the taste and smell) and very tasty, and this recipe was pretty easy to put together. (Of course, my dish doesn't look quite as colorful as Kay's.... but I'm working on that.)
Kay's Braised Chicken, via PW
serves 3 as posted here, I (almost) doubled this recipe

3 chicken quarters (I used 5 quarters and 2 boneless skinless chicken breast halves)
3 tomatoes (I still only used 3)
2 bell peppers (I used 3 - 1 red, 1 yellow, 1 green)
1 large onion (I used 1 really BIG onion)
3 tomatoes (I still only used 3 tomatoes)
1/2 cup chicken broth (I used ~1 cup low sodium)
3 garlic cloves (I used 5)
1/8 tsp ground cumin
1 tsp paprika powder
1 tsp curry powder
1/4 tsp (heaping) cinnamon
1/4 tsp salt
3 tbsp oil (I used olive oil)

chili pepper - optional (I omitted)

DIRECTIONS:
1. Preheat oven to 350 deg F. Get a big roasting pan out (I had to get my turkey roasting pan, minus the rack, up from its cozy home in the basement. I try hard to use that thing more than once a year.) Edit: Fine. Josh had to get the pan from the basement. I avoid going down there.
2. Slice the bell peppers and onion, and chop the tomatoes, and slice up the chili pepper if using. Clean up the chicken pieces, but leave the skin on. (Or take it off. But the recipe leaves it on. I guess its up to you.)
3. Grate/mince/or press the garlic into a small bowl. Add oil, cumin, paprika, curry powder, cinnamon, and salt. Mix together. This is your fragrant, yummy, marinade. Set aside for the moment.
4. Generously season the chicken with salt and pepper. Heat a little oil in a skillet and brown up the chicken a bit on both sides (1-2 min each side on med-high heat). Then put the pieces in a single layer in your roasting pan.
5. Brush the chicken with half of the marinade. Instant color boost!
6. Spread the bell pepper slices and onion slices (and chili pepper if using) around the chicken. Place a few slices underneath and on top of the chicken. Lightly and haphazardly dab the peppers an onions with the other half of the marinade.
7. Add the diced tomatoes to the top of everything, trying to distribute them evenly.8. Pour the chicken broth into the bottom of the pan, pouring down the side of the roasting pan so that you don't wash the marinade off the chicken and veggies.
9. Bake for 1 hour at 350 deg F. (Mine took 1 hr 15 min.) Halfway through baking, remove the pan, flip over the vegetables, and spoon some of the juices back over the chicken. Put it back in for at least another 30 min, or until the chicken is done.(Josh said he deserves a shout out for his photography help. He took to pics of me marinating the chicken. And then when it was done, I made him carry the hot pan - yes, with potholders - over by the window and hold it so I could get better lighting. Oh, the things he endures for this blog :) )

10. Enjoy! (I served with rolls, but a side salad would be a good idea too).

REVIEW:
This was excellent. They flavors were great, and the chicken was incredibly tender and moist. It almost fell off the bone! The ONLY thing - I should have doubled the marinade part of the recipe too. I just used a little extra of each spice - I didn't want anything too strong in flavor for my guests, but at the end I was trying to stretch the marinade to cover the veggies. More would have added to the flavor of the juices the chicken was baking in, only helping the chicken get more flavor. We will definitely make this again. Also, I saved the pan juices. I let the fat solidify on top, and skimmed it off. I intend to use the broth to make some amazingly seasoned rice in the near future. I can only imagine how good that will be!